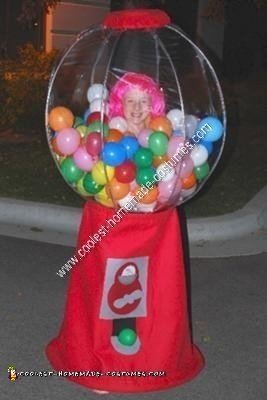
My daughter, Megan, decided that she wanted to be something amazing this year for Halloween. She came up with the homemade Gumball Machine Halloween costume idea all on her own. I searched for ideas on the web (including this site) and I did find some Gumball Machine costumes. However, they weren’t quite what I was looking for. My daughter was set on the fact that she wanted to be inside of the machine. So, I thought of making the costume more true to the actual Gumball Machine by incorporating the “glass globe”.
This costume took a lot of planning and measuring before I was able to start. I then began by using a heavy wire that would hold its shape and cut 8 of them to length. The wire was then placed inside clear vinyl tubing. At the ends I tied them together by using ‘t’ shaped plastic sprinkler connectors. I then used small pieces of wire and tubing to complete the loop at both the top and the bottom of the globe.
Next, I made a pattern using poster board for the panels that I would use to make the globe. I didn’t use the thinnest vinyl available because I was afraid that it would be too thin and tear, so I used more of a medium weight. I cut 8 pieces of vinyl using the pattern. One section of vinyl was only a half of the pattern piece as I would cut the other half using a mesh fabric. This would allow air flow inside the globe for the costume wearer. The pieces of vinyl were then sewn together using the longest stitch your machine allows so that it doesn’t rip apart. I allowed about half inch seam allowance so that I was also able to sew “pockets” where the tubing/wire would go in order to hold them into place.
Once the “globe” is sewn, insert the tubing/wire into each pocket. This took a lot of patience and Pam cooking spray to glide them in. At this point, your “globe” is still very flimsy. My husband cut 2 donut-shaped circles (one for the top and one for the bottom) out of quarter inch plywood. This would give us something to attach the upper and lower ring of the globe too. We taped each tube/wire ring to the plywood and then secured with a carpet tacker. This made the “globe” much more stable.
To secure the “globe” to my daughter’s waist, I bought 3” dense foam. We cut it into a circle shape the size of the bottom ring and attached it to the plywood using zip ties. We also cut out a smaller hole in the center of the foam smaller than my daughter’s waist. This would be what would hold the “globe” on.
It took some serious squeezing in and out of the costume, but once she was in, it would fit ok. After the fact, I’m thinking that we could of also added suspenders attached to the bottom wood ring to help stabilize it and make it even easier to carry.
Next, I took measurements on how long the “skirt” would need to be and how wide the top and bottom of the skirt would need to be and cut out red material accordingly. I made the costume warmer by ironing the material to a heavy weight fusible batting. I created a pocket at the bottom where I inserted a hula hoop to hold the bottom out and in a circular position. I just added elastic to the top so that it would hold securely onto the wooden/foam ring once complete.
I then added details to the front using fabric pieces and foam. I printed an oversized quarter off the internet and secured it to a piece of thin cardboard. I also safety pinned a balloon at the “gum return” to look as if there was a gumball coming out. For the top of the globe I just used leftover foam to sculpt the top piece and hot glued on red material. It was attached to the top wooden ring using hot glue. There was a hole left in the center of this piece as well to allow for some access into the globe when the costume wearer is in the costume.
Then, just add lots of gumballs (balloons) and a colored wig and your look is complete!!! My daughter was a huge hit at her Dance Party and on Halloween night. She also got 1st place for her age group at our local costume contest. Although this costume was time consuming and took a lot of pre-planning and re-planning, it was worth it in the end to see my daughter’s smiles!





WOW, That is amazing..
I was wondering if i could get your email.
Because it seemed a little unclear on how to make it.
I want to use this idea for an end of year costume party that i have.
Thank you.
I have to say, you did a wonderful job on that costume. I would like to make one for my daughter, but the instruction was sort of unclear. I would like more information about the costome,
Thanks for the comments! I had a terrible time explaining how I pulled this costume off. Please let me know what was unclear or specific questions you may have and I will try to help you out as much as I can!
I’m in LOVE with this costume! I’m very confused though on how you did the whole globe. Can you explain again….sorry!
How long did this costume take to make?
i really want to be a gumball machine this year! thank youthat is exactly what i might make my mom do!
My Daughter would love to do this, but I too found the globe part a little confusing. How long did it take you to make?
Way to go!
Is there any way you can give me a material list? This is amazing! I am not good at sewing and i was wondering if you think i should give it a shot or if it takes extreme skill level to pull this off?
Thanks for all of your comments! This costume was not easy to pull off! I would say that the sewing isn’t too difficult–mostly straight lines, but sewing the vinyl could be a challenge for some. I really had a hard time explaining how exactly I did the globe. I am sure that there is a better and/or an easier way to pull it off, so let those creative juices flow. If I can answer any specific questions I would be happy to do that for you too! Be prepared for a time consuming costume with some bumps in the road, but it is worth every bit of it when you get to the end result! Good luck all!!
How does she make the hoop? How does she breathe? Just wondering..
We used a large, clear beach ball we found on Amazon and skipped the sewing part, and used pit balls for the bubble gum.
Looks great! Thanks for the ideas!
Can you please tell me how you made the pattern into what shape and how did you do the sewing if the pattern are not straight
To the lady that used the beach ball…how did you keep your globe up? Did you use wire as well?
Not sure which “hoop” you are referring to, but to breath, one of the panels in the back of the “globe” is mesh instead of vinyl and there is also an access hole at the top in the center of the red top.
Laura…Are you referring to the pattern of the “globe”? If so, you have to draw a pattern that would be wider in the center, while getting slimmer at each end. When you sew these together they will form your globe.
And a beach ball is a clever idea, except I would be concerned with lack of air, so maybe sew in a mesh panel to the back of the ball for airflow.
love the costume is there any way you stii have this and if so would you wnat to sell it