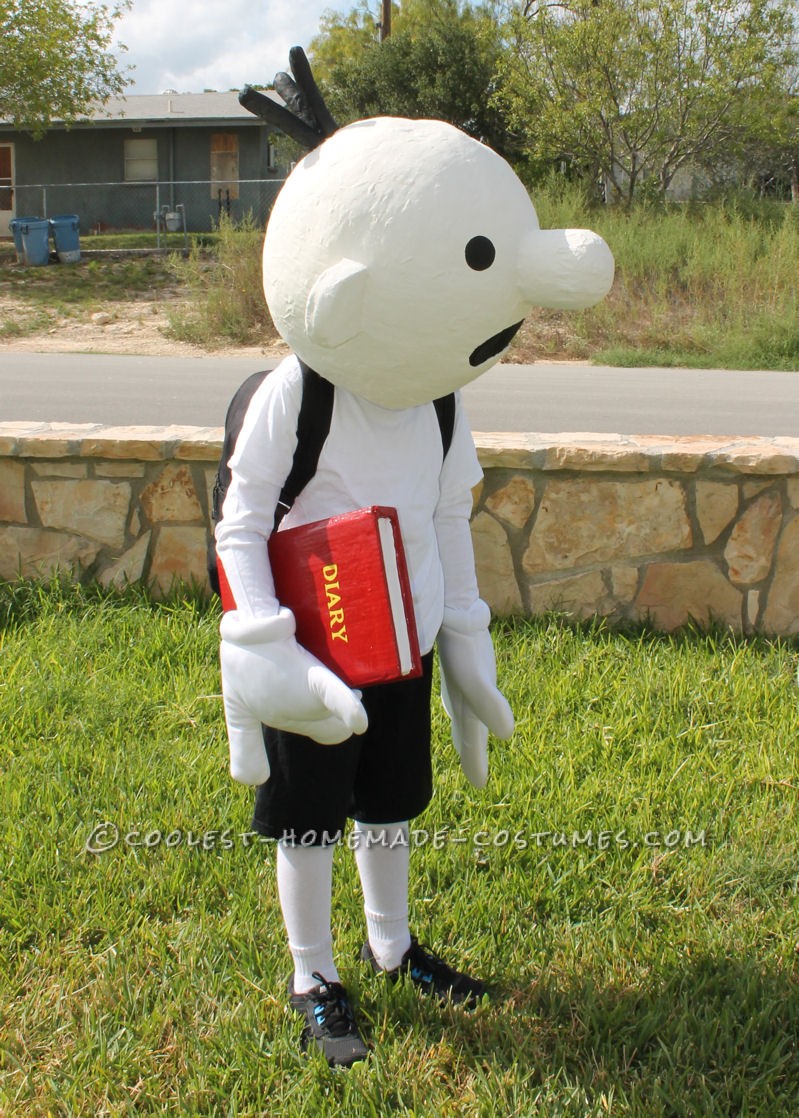
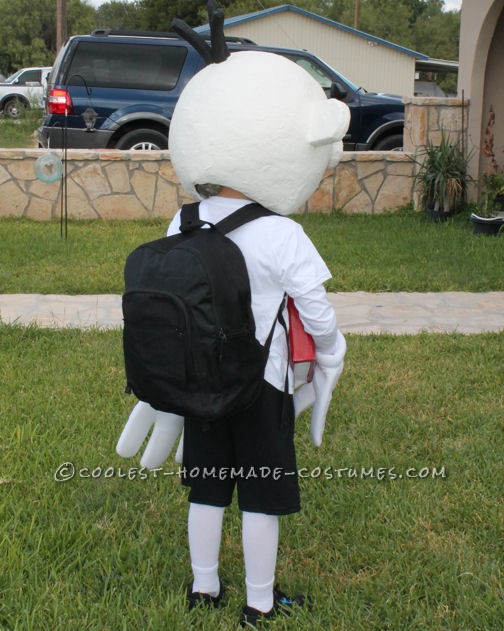
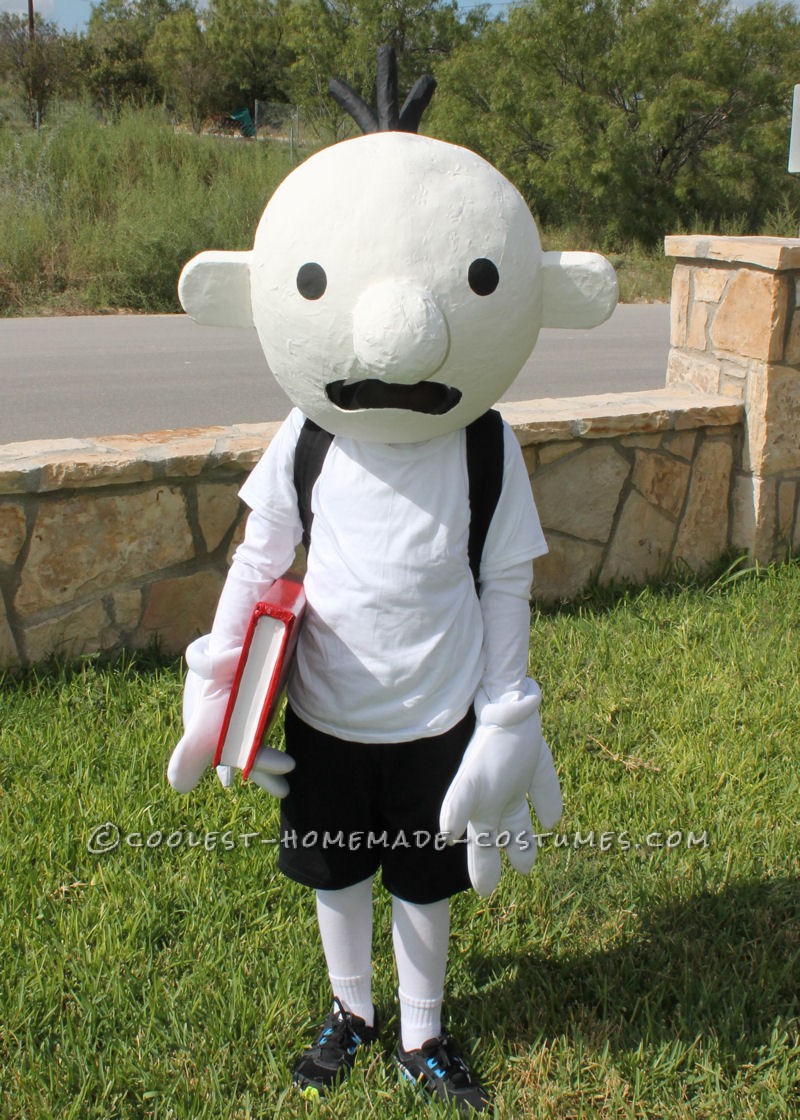
This “Greg” from ‘Diary of a Wimpy Kid’ cartoon drawing is very simple to make and only requires a few materials. Though I have written quite a bit on how to make this costume, overall the task is quite simple. Don’t let the length of these instructions discourage you from attempting. I have gone into detail to help you better understand how each step is done. Once you learn these steps, you will have learned ways that will make ANY costume in your imagination possible.

Materials include:
- cardboard, Styrofoam, newspapers, flour and water (paper mache), paint, hot glue and glue gun, wire cutters or scissors, heavy duty box cutter, duct tape or masking tape, screen or black mesh, wood skewers or pieces of wire, white leggings or stockings, white long sleeved shirt, white t-shirt, white socks, black shoes, black back pack, and material to make over sized hand gloves (or buy some like I did), and a beach ball the size that you want the head to be.
For the head and book, you will need lots of news papers and flour and water for paper mache, sheets of cardboard from an old box, and some pieces of Styrofoam chunks. I used pieces from packing and shipping braces that come in new electronics for example. I keep things like that for such uses. My husband usually makes fun of me for keeping “trash” in our attic, but he doesn’t laugh when he sees the final result of these collections of trash being used to create cool homemade costumes.
If you do not hoard cardboard boxes or Styrofoam in your attic like I do, then you might be able to find some if you drive behind your local grocery, or department store and look near their dumpsters. There’s no shame in it, because technically, you are recycling and that is good for the environment and good for you since you didn’t have to spend money! Especially if you are only making your own costume to save some dough!
You will need a few wooden skewers which can be found at the grocery store near the foil or disposable baking container area or you can use and old wire hanger if you have some wire clippers to cut 3 small pieces for the hair. Duct tape and/or masking tape and hot glue are a must. A section of mesh screen or a pair of old black panty hose will do…(or any sheer black material) for the mouth hole.
Paint, a large beach ball, and a trash bag large enough to go over the ball, and a heavy duty box cutter. I usually have lots of paint and all these materials in my home, so the only thing I had to buy was the beach ball and the clothes for this costume. The hands I bought online because I attempted to make my own and got too terribly frustrated and gave up!

THE HEAD:
To start, make sure you will be working in an area that will make for an easy clean up. This can get very messy, so a tarp or drop cloth will be very helpful. Working outside also makes clean up less of a hassle. Inflate the beach ball and put the trash bag over it, making sure that the air valve is at the bottom where the bag will be tied. In other words, the valve will have to be deflated once your paper mache is dried, so you want it at the bottom of the mask (where the neck hole will be) so that you can open and let the air out. If it is not at the bottom when you start, you will have to puncture your ball.
Grab the ends of the bag and twist together making the bag as flat and smooth against the roundness of the ball and secure with a twist tie or rubber band. Make sure you let excess air out of the bag and smooth it out so there are no air pockets that will deform the shape of the head/mask. Find a small box that you can rest the bottom of the ball on (where the tied end is /the neck hole will be). Tear strips of news paper about 2 inches wide, all the way down the length of the paper. It’s easier to tear down than across the page.
Using a large bowl, mix flour with warm tap water into a consistency that looks like gravy or a creamy soup when stirred. You may end up making several batches for the different layers. The more layers, the harder and more structurally sound the head will be; won’t collapse and will be heavier, too.
Start dipping one strip at a time and raking the excess paper mache off by putting your fingers like scissors around the strip at the top and move it down to drip all the excess flour goo back into the bowl. Be careful not to tear the strips because they tear easy when soggy and it can get frustrating. Placing each coated strips on the top of the ball, smooth out wrinkles, and then work your way down the ball, covering the entire ball except for a large hole at the bottom of the ball.
When you get one layer done, start the next later on top of where you started the layer before, because that section will be the driest. It would be good to go in the opposite direction with your strips than the previous layer. If the last layers were horizontal, then go vertical with the next later, and then alternate layers as you continue. If you let each layer dry before starting the next, it would actually be a lot faster than caking a bunch of layers all at once and then trying to wait for them to dry.
That can take all day, and then the inside layer won’t be that dry and when you deflate your ball, the head will start to lose its perfect shape that you worked so hard on! Be patient and the outcome will be more perfect! Once you’ve got a lot of layers on and its dry enough to let the air out, make sure you’ve got it hard enough. Knock on the top, with your knuckles and you can tell if it’s ready. If it’s cold at all, it’s not dry yet, even if it looks like it.
I leave mine out in the sun to dry faster. South West Texas sun is perfect for this! If you do put it outside to dry, make sure you put something near it so it if tries to blow away, it won’t get far. I put mine outside and it blew off a table and cracked open when it hit the ground. I had to repair the tear with more layers and the shape wasn’t as round as before, but it’s really hard to tell now that it’s complete.
While you are waiting for layers to dry, you can take some Styrofoam and cut two pieces to make the ears. Round off the ends of both ears and make sure that they are both the same size. Cover with masking tape to get a smoother appearance and then paper mache. No more than one layer is needed since they are not hollow. For the hairs on top, I used an old pool “noodle” that I cut down into the skinny, rounded, finger like projections. You can use just about anything for this, even if you have to twist up news papers and tape around each twist to get the right shape. Paper mache the hairs.
For the nose, find a container such as a large yogurt or cottage cheese tub, stuff with wadded up news papers until the top is rounded. Place a small plastic shopping bag over it and tape or tie the ends to make the bag tight against the shape, just like you had done with the head. Paper mache, not many layers will be needed since you will stuff the inside with newspapers once its dry.
Once your big ball is dry and you’ve opened the valve to let the air out of the beach ball and removed it, you can remove the trash bag by carefully peeling it from the inside of the paper mache head or just leave it in there and cut the ends off. Do the same with the container for the nose. It might be more difficult to remove than the beach ball, so grab the bag and try to wiggle it to get the container free.
You may have to cut a slit to free the cup, like I did. Or if it’s the right size and you don’t need the container again, just leave it intact to glue on the head later. Now, measure the diameter of the head of the person that’ll wear this mask and cut the hole at the bottom of the mask allowing room for the person’s nose to not get scraped on the way in and out of wearing the thing. I used scissors to slightly and neatly trim the hole, and then used masking tape to cover the cut edges to make it more comfortable on the neck of the person who’ll be wearing it.
Then using a picture from online, I drew circles with a pencil where the eyes and nose should be, then drew the mouth and marks where the ears should go. After your ears and nose are dry, trim the end of the nose that will be attached to the head and stuff it full and compact with news paper. Skip this if you have decided to leave the container inside the nose shape and skip the next step. Tape over the entire opening of the nose several times to make a solid piece that you can glue to. Hot glue the nose and ears onto the mask.
Then take those wood skewers or pieces of wire and cut each about 3 inches long. You will take each skewer and jam it into the bottom of each hair. Find out where the hairs should go and make 3 dots where you will punch three holes to allow the wire/skewers to stick into the top of the head with an ice pick or a nail. Squirt glue in and around those holes and immediately stick the hairs on the head and turn them until they are in the right position.
After they are secure, then take small pieces of dry news paper or paper towel and wad up and stuff into the cracks and gaps around the ears and nose where it is attached to the head and then paper mache over it to conceal and make them look like a uniform piece with the head. You may or may not need to paper mache the hairs. Allow to dry completely. If you happen to have painters caulk and a caulk gun laying around, you can do that instead of paper mache-ing the gaps and allow it to dry.
It may have crossed your mind to just fill the gaps with hot glue. DON’T. It will run and just make a big ole mess! Save yourself the trouble. Now cut out the mouth carefully with a box cutter. Paint the whole head, but not the inside. Paint the cut edges of the mouth. Once it’s dry and needs no more coats, then re-draw the eyes with a pencil and paint black. Paint the sprigs of hair while you are at it. If you are using screen that is not black, then paint it black now.
Once dry, you can glue the section of screen to the mouth hole from the inside of the mask. I used painted screen, but if you are using mesh or panty hose material, glue one section to the inside of the mouth, let dry, then stretch it out and glue little by little. I made a small, thin pillow and glued to the inside of the mask so that the back of my son’s head would be nice and comfy while the mask is resting on the back of his head. You can use a strip of foam cushion if it’s handy.

THE BOOK:
The book is quite simple. Cut two big pieces of cardboard that are the same size as each other and the size that you want the book. Cut another piece that is the length of the book and the width of how thick you want your book. Find some Styrofoam to put in between the two bigger cardboard pieces for the desired thickness. The Styrofoam in the middle for the pages will be as thick as the book, but not as long as the front and back book covers; just like a real hard back book’s pages are smaller than the covers.
Sandwich the Styrofoam in place with the large book covers and glue. Then put the skinny strip of cardboard that is the “spine” of the book and tape to the front and back covers down one side of the book with masking tape. Paper mache it to look uniform and to conceal cracks and gaps. Paint when dry and then paint DIARY letters on the front.
THE CLOTHES:
All that is left now on the Diary of a Wimpy Kid costume are the clothes. I found some white footed leggings/tights in the girls’ section at Wal-Mart, a tight white long sleeved shirt, and used a white undershirt over the long sleeved, and a plain pair of black shorts over the leggings. Of course, you wear plain white socks and black sneakers. I happened to have a black Texas Longhorns backpack that we covered the logo with a swatch of black fabric safety pinned on the corners. I attempted to make my own white over sized hands with white material and batting, but I failed so I just went online and found some cartoon hands for $8.00.

WRAPPING IT ALL UP:
Last you need to make sure you clean up your mess, and enjoy showing off your creation!! In conclusion, making homemade costumes can be challenging, but also quite fun. You will surprise yourself at what you can do with simple materials that most people toss out with the trash. Homemade costumes have become a tradition in our house, and the kids look forward to costume time all year. I hope you have learned something, and that you are able to create a masterpiece that will attract the awe and admiration of many with these instructions. Good Luck!

Video:
http://youtu.be/OmqhXsxjdcA


Do you happen to still have this costume? We are looking for one and I am interested in purchasing it.
Hello! could you tell me what the hands are called? i am having trouble finding some online.
Thank you
Was the child able to see thru the mouth section?