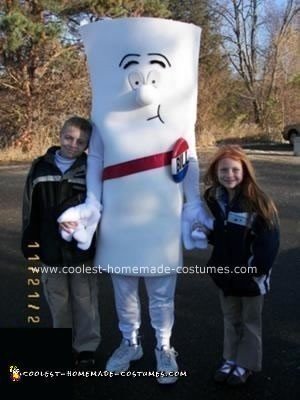
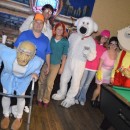
My wife was just elected to office, so I wanted to surprise her on her first day in office. Thanks to Tammy B. (see her awesome Bill costume also on this site) I had the instructions for making my Bill costume. I used a Bill figurine that I bought for my wife as a model.
Like Tammy, I used a foam mattress pad to make the body of the Bill costume. The pads I found were smooth on one side and textured on the other. You may want to open the package at the store to make sure it is not textured on both sides. It was hard too find one in the store that had not begun to yellow.
I used a full size mattress pad, and used stick-on Velcro attached to the edge to connect the two ends together, making a tube. Bill’s body is slightly more narrow than his head, so I cut the ends of the mattress pad off at a slight angle to give him the flare at the top. The red and blue diagram at the bottom left of the picture illustrates what I mean.
For the nose, I used a piece of the foam that I cut off and hot glued it to the bottom of a 16 ounce plastic Pepsi bottle. Then I cut it off to the right length and glued it to the costume. If you use this method, you want to use a bottle with thick plastic. Some of the water bottles use very thin plastic, and the glue will melt right through them. Also, if you fill the bottle with cold water first, it will help keep the glue from melting the plastic.
I could not find tights, for the arms and legs, but I did find some ladies pajamas that fit snugly. I found the cartoon hands at a party store. Like Tammy, I used some wide ribbon material for his sash. The eyebrows are fake fur, and his smile is made from black felt.
For Bill’s button, I used heavy plastic party plates, because I could not find a suitable Frisbee. I think that the Frisbee would have worked better – the plates were a bit too flimsy and I had to glue two of them together. The foam is not very sturdy and distorts easily, so anything that you attach to the costume should be light weight. To attach the button, I hot glued two rings to the inside of the button (used lots of glue, and roughed up the surface with sandpaper so that it wouldn’t pull off) and ran a string from the rings, through the foam and tied it off on the inside to a large piece of scrap foam so that it wouldn’t pull through the hole.
The eyes are the technical triumph I am most proud of. I made them out material from a metal speaker grill. To form the eyes, I cut a die out of 3/4” thick poplar (it is fairly strong and easy to work with). I used a jigsaw to cut an eye shaped hole out of one piece of wood, and cut another piece that fit in that hole (with a gap of about 1/8” all the way around). I rounded the edges of the wood with a router.
Then I cut the speaker grill to the shape of the eye, with about ½ inch overhang (don’t forget to notch the corners on the bottom so that they don’t wrinkle up). The grey grey/yellow diagrams at the bottom of the picture give a better idea of what I mean – the all grey image is the shape to cut out the speaker grill material, and the yellow part of the second image represents the eye shaped hole that the speaker grill material is pressed into.
I sandwiched the speaker material between the two pieces of the die, and used a bench vise to press the grill into the die. Then just paint, cut out eye shaped holes (a bit smaller than the eyes) and glue in place.
One more note. I think that light or air (or both) causes it to turn yellow – so to preserve Bill in pristine condition you should put him in an airtight bag, and keep him in a dark place.
Your comment has been sent successfully.