For a long time now I wanted to make a Transformer costume that actually transformed! Making your own costume can be very time consuming, so I needed an idea that would be simple enough that an amateur could do. In the past I did a Zoltar costume and Power Loader costume. The Zoltar costume is featured on this site.
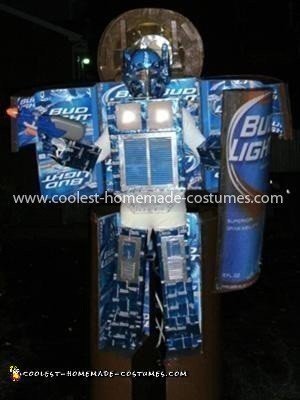
I am a big fan of Bud Light, so I decided that I would make a costume that transformed from a Bud Light beer bottle into Bud Light Optimus Prime Transformer from the 80’s.
To start the project I downloaded multiple pictures of Optimus Prime to get an idea of how everything needed to be designed. Once I knew how I was going to design the costume I needed to start collecting Bud Light cans. I came up with this costume idea in July, so starting then I collected Bud Light cans. The cans would be used to make the armor of the Transformer.
The construction of the bottle began in August. I first started with the feet. I used 2 office trash cans that would act as stilts for the costume. On the top and bottom of each trash can I used 2 x 8’s. 2 x 3’s were used to attach the top and bottom 2 x 8’s in the trash cans.
The next step was to find a circle that would be big enough to fit me inside when I would be in the bottle form. I looked around my house and found a Papasan chair base that would work for the outline of the bottle. Particle board was used to create the base circle.
Once the particle board circle was cut out it was then cut in half and attached to each leg. 1 x 1’s were added to the feet to act as fasten points for the shell of the bottle. 1/8” Eucaboard was used to create the shell of the bottle. The Eucaboard worked the best because it was durable and just flexible enough to form a circle.
1/4” wood floor underlayment was used to finish the rest of the legs. Once the legs were full assembled I attached moving straps on the legs, so it would be easier for me to strap into the legs and walk in them. Both legs were covered in Bud Light boxes for appearances.
The top half of the bottle would be worn as a backpack. A racing harness was screwed into a rectangle frame made of 1 x 1’s. Two more Papasan circles were cut out of the wood floor underlayment and cut in half. Two halves of the circle were screwed into the frame and covered in Eucaboard to form the back of the bottle.
The same thing was done to form the front of the bottle. A half circle was made and cut in half. Each half was attached to the back pack with strip hinges. This allowed for the front of the bottle to open up and form wings. When the wings were closed they were locked in by trunk hinges. The backpack and wings were then covered in Bud Light boxes.
The front label/shield of the bottle was created using 1 x 1’s and Eucaboard. The handle of the shield was an old toilet paper holder. The label of the bottle and neck were made by large format posters. I sent them the design and dimensions and they made me two sticky back posters. The shield was attached to the costume using square bend hooks screwed that were attached to the shield and would rest in circle hooks attached to each foot.
The next step was to make the neck of the bottle. A cement tube was used for the shape of the neck. The tube was attached to the backpack using desk cabinet hinges. This would allow for the neck portion to open and slide down my back. The bottle cap was made out of a shipping tube cut in half.
Once the outer bottle skeleton was done it was time to make the armor. The Legs were made using catchers shin guards. The hands were made using Lacrosse gloves. The helmet was made from a baseball helmet. The front of the mask was made from an aluminum venting sheet. The pieces of the mask were made from compressed foam and hot glues to the helmet. Battery powered blue LED lights were installed in the helmet to turn my eyes blue.
The chest plate of the armor was the hardest to make. The chest plate was attached to the backpack by 1 x 1 pegs that slid into two opening on the backpack and locked in using two key chain holders. A pencil holder was bolted into a piece of wood underlayment.
Push lights were used to create the head lights. The headlight glass was made from ceiling light covers. The front grill of the legs and chest are floor vent covers. The chest grill was attached on a strip hinge and allowed the front to open and show the hidden refrigerator.
Once everything was done it was covered in Bud Light Cans. It took over 300 cans to cover everything. Each can had to have the top and bottom cut off and then cut down into rectangle squares. Each square was then hot glued to each piece of the armor.
The entire bottle was painted in a high gloss brown paint to give it the effect that it was a bottle.
The final size of the bottle was a little over 7 feet in bottle form and about 6’7” when in transformer form. The costume took me about 3 months to complete working on it here and there when I had the time. The only flaw was that it was a little heavy. I could only be in costume for about 30 minutes at a time before I needed to take a break. Overall people were impressed by the costume. I would hide in corner in bottle form and then when people least expected I would transform into Bud Light Optimus Prime.
I attached a power point slide link of the costume being built, and a few pictures of it in action at some bars by me. If you have any questions about how the costume was made just let me know.
Special thanks to Elad for taking the time to make this website, and for hosting an Awesome Halloween costume contest each year!! I only found this website last year and wish I found it earlier. I have a great time looking at everyone’s Halloween costumes and it helps me with ideas for new ones. I can’t even imagine the time and effort it takes to keep this site running. Keep up the good work!

How did you come up with this idea?? Very cool!