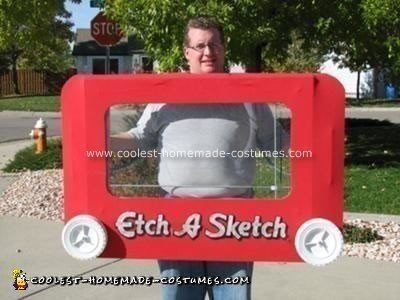
Each year, our family does a theme costume, and this year, we decided to be classic toys. One of my favorite toys from my childhood is the Etch a Sketch. I knew it would be easy to make a billboard / sandwich board style costume to look like the Etch a Sketch, but I wanted to go one step further… I decided to make it FUNCTIONAL!
A real Etch a Sketch works with aluminum powder on the inside, and this is too messy to expand to the large size. I decided to use the same style of wiring as inside a real Etch a Sketch, but use a piece of Plexiglas and a dry-erase marker in place of the stylus removing aluminum powder from the glass.
Let’s get started!
Materials:
– 2 pieces of 1/4″ plywood, 1 the size of the finished piece, the second slightly smaller. (Had them already)
– 1 sheet of plexiglas (I used a 24″x36″ from hobby/craft store)
– 2 lawnmower wheels for the knobs (I got 8″ wheels from hardware store)
– 1 crib mattress bed sheet (mine was a jersey knit material)
– 40-50′ of 1/16″ wire rope
– many 1/16″ wire rope ferules
– 8 small springs
– 1 long steel rod, cut into pieces just less han 24″ and 36″
– 9 screen door ball-bearing wheels, I used these as the pulleys. (hardware store)
– 2 long (3″?) standard 3/8″ machine bolts.
– several 3/8″ nuts, washers, a couple nylon lock nuts, rounded nut caps.
– 8 small machine screws and nuts to attache the denim shoulder straps
– 2 cheap drawer pull handles (one on each side to help hold it steady when someone is drawing)
– old pair of jeans, cannibalized to make the shoulder straps.
– silver and white spray paint
– small block of wood to act as the “shuttle” for the pen / cross-piece for the two rods
I started by taking the plexiglas and tracing it onto the bigger piece of 1/4″ plywood. This allowed me to then draw some guidelines of what I thought the rest of the costume would look like. I centered the plexi onto the plywood and then drew the rest of the lines to have a consistent width border as much as possible. Drill holes for each of the corner pulley stacks.
Each corner has 2 stacked pulleys, as there is a loop of wire on each end of each steel rod, and the horizontal wiring has to be separate from the vertical wiring. I used the “bottom” pulleys for the horizontal bar, since the bar was longer and heavier – it could rest on the backer board.
Prepare the rods by cutting to length — they should basically be just shorter than the distance between your pulley stack bolts. Drill a small hole on each end of the rods to allow for the wiring to be threaded onto the rods.
Cut a small block of wood and cross-drill two hole that will be the cross block that also holds the marker at the end. Thread this block onto the rods before wiring.
Crimp one end of the wiring onto the one end of the rod, and string around the pulleys on one end to measure the length of cable. Cut the cable slightly shorter, finish the end. I used a small spring to act as a tensioner to keep the loop taught. Start by doing the four loops attached to each end of the rods.
Next you will need to make a second loop for each axis that loops over itself (figure-8). This second loop goes in the opposite direction, but on the same pulleys as the initial loops. For example, the horizontal bar has a vertical loop on each end. The figure-8 loop would go from the bottom-left pulley to the bottom-right pulley with a twist/cross in the middle. What this allows you to do is move one of the vertical loops on the side (or just turn the pulley) and all the wires should work together to move both sides up and down together. Make a similar loop for the vertical rod (the figure-8 loop will be vertical as well, as the end loops are horizontal).
Next you will need to drill the holes for the “knobs”, and thread big bolts with rubber gaskets. The gaskets will provide the friction for moving the wires when we turn the wheels. Measure another loop of wire from each of these posts to the appropriate pulleys to cause proper movement. If you are not using tensioning springs, you could just go to the closest bottom corner. I needed to string longer loops and use an extra pulley to allow for the wiring to get around the glass because the springs would not go around the pulleys.
Cut the front board window, and glue the bed sheet hole and Plexiglas to the back. Attach to the pulley stack bolts and tighten down. Stretch the bed sheet over the backer board. Cut holes into the bed sheet where the knob posts are.
Spray paint the lawnmower wheels white, then attache them to the newly exposed posts. Use a nylon lock nut to pinch the wheel and make it turn the bolt (and wire loop by way of the rubber grommet).
Paint or print out an Etch a sketch logo and attach to the bed sheet with spray adhesive.
I created two criss-cross shoulder straps out of an old pair of jeans: Cut two long strips from the legs, sew into nice straps. Attach each end of the straps with two small bolts through the backer board.
Attach a dry erase marker to the block of wood with a rubber band or zip tie.
Have fun showing off the best costume ever! Everyone stops you and takes pictures and wants to give a try drawing something. Keep a treat in your pocket for those who manage a semi-decent circle.

I’m so jealous i can’t do any mechanics like that
wow that’s so cool but no one in my family is that mechanical
I am going to have to dismantle an etch a sketch and build one of these with my boys. What a fun project. I want one to hang on the wall for fun all year round! Great job, it looks awesome!!!
i want to make this so bad