When we asked my two-year-old son what he wanted to be for Halloween he responded with words we have heard often in recent months, “Cuckoo”. For the past year he has been obsessed with cuckoo clocks. It started when he watched The Sound of Music and fell in love with the song “So Long, Farewell” where the kids sing “cuckoo, cuckoo” and dance behind their siblings. He loved to sing that part. Then he spent time with his great-grandparents, who have a cuckoo clock, and the obsession was official. It also helped that he already had a rich fondness for birds.
So anyway, my wife and I looked at each other, shrugged, and agreed that we could come up with something. We figured at first that maybe we would just have to buck-up this Halloween and buy a costume online. However, after fruitlessly scouring the Internet for first a cuckoo clock costume and then just a viable bird costume, we realized that this would have to be a Homemade Cuckoo Clock Halloween Costume if it was going to happen at all.
With that understood, we figured that there were really no limitations to what we could do with the costume if we were making it ourselves. Obviously, in aiming for cuteness, we would make our son the cuckoo bird, so the costume would essentially be made up of 2 parts: the bird and the clock.
At first, we were going to attack the project as a whole, but after immediate creative disagreements on how elaborate the clock should be (i.e., she voted for a 2-dimensional “simple” clock), we agreed to handle the bird and the clock separately—she would take care of the bird, and I would make the clock.
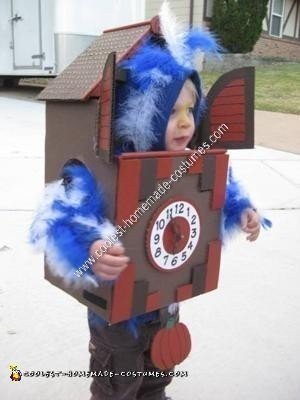
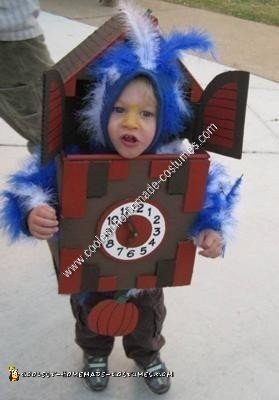
The bird part of the cuckoo clock started with a blue hooded sweatshirt. My wife bought the sweatshirt at Wal-Mart for $6 and some blue and white feathers at a craft store for $1.50. She started using fabric glue at first, but found hot glue to be much more effective despite a few minor burns. She glued the feathers all over both arms, the hood, and the chest. She made what resembled a crest on the hood using a few feathers glued to the very front and center of the hood. The final touch for the bird costume was to use yellow face paint on our son’s nose. We bought the paint for kids 3 and under from a craft store, so it cost a little more ($5).
The clock part of the costume was more elaborate than the bird, but still not too hard to make. I knew I wanted to start with a cardboard box, but I needed to figure out exactly what size. I figured that I did not want the clock to come down past my son’s waist so that he could still walk. However, I knew that what I planned to do to make the roof would decrease the length by a 4-6 inches, so I needed one that was about the 6 inches longer than his height from waist up. As far as width, I thought that it would work best to have the box/clock rest on his shoulders, so I measured him across the shoulders and added a couple inches to allow us to get it on him. I thought the depth (front to back) would be negligible, but after making the costume, I definitely think you need at least an 8-inch deep box.
I started with the heaviest-duty cardboard box I could find. The one I used was for an industrial product, so it was 2-layers thick and had reinforced corners. For reference, our box measured 25” (length) X 11” (width) X 9” (depth). Here are the steps I took to make the main shape of the clock:
1. Seal the box completely with packaging or duct tape. Add whatever tape needed to make the box really sturdy. I put some tape across (perpendicular to) the top and bottom seems to make sure it would not come apart.
2. Stand the box up on one end (11×9 side) so that one of the 25×11 sides is facing you. This will be how the finished clock will be worn, so from here on, I will refer to the top, bottom, sides, front, and back as they are viewed from this perspective. Oh, and I will also call it a “clock” not a box.
3. About 1/3-1/2 the way down the front of the clock, make a horizontal cut from one side to the other using a utility knife or box cutter.
4. Make a similar horizontal cut along the top-front edge of the clock.
5. Then cut the front side edges so that there is now a square-shaped hole in the front of the clock. This opening will be where the wearer’s face will go.
6. Next, cut from front to back at the exact center of the top of the clock. Continue this cut for a few inches down the center of the back. You have essentially just made the cut to the center of the roof.
7. Using some creative trimming, folding, and taping, make an A-shaped roof to the clock. I had to cut some of the excess off the back of the clock as well as shorten the two halves of the roof in order to get the right slope and shape. In order to keep the face opening wide, I started each side of the roof with a fold about 3 inches above the bottom of the face opening.
8. Tape the roof to the correct angle. Add duct tape to increase sturdiness.
9. Now, in order to give the wearer some peripheral vision, I cut the front 1/3 off the roof and the sides (down to the bottom of the face opening)
10. Finally, cut an opening on the bottom of the clock big enough for the wearer to put the clock on over his head. For me, this meant basically cutting the whole bottom out. I added some tape along the bottom edge to keep it sturdy.
With the basic shape of the clock made, my next step was to take away any resemblance that it had to a box. I cut some brown poster board to fit the sides, front, and back, and I secured it with hot glue. I used some scrap cardboard to create smoother sides to my roof. I cut the pieces about 1” wider and 1” longer than the roof as it was. This made the appearance of eaves above the front, back, and sides of the clock. I painted the roof brown because I was out of poster board. Now I had an all-brown clock-shaped box with a hole in the front and bottom.
I put the thing on my son and noted where his shoulders were on the sides of the clock. After taking it off, I used a roll of masking tape to trace circular arm openings on the sides. I cut these, put it back on him, and made sure it fit correctly for his arms.
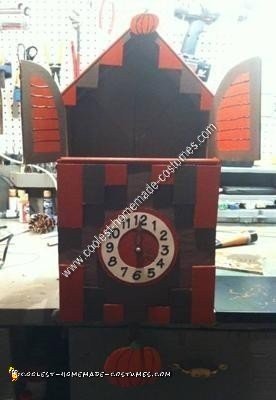
I used mainly acrylic paints and scrap cardboard to do the decorating of the costume, but I took a couple short cuts and a long cut or 2 as well. For instance, I made the clock face out of cardboard, poster board, some stick on numbers, a bolt and decorative nut, and some scrap balsa wood. The only hard part was using my Dremel with a sanding attachment to carve the balsa wood hands. I used scrap cardboard and acrylics to make some decorations for the rest of the front of the clock (including the front edge of the roof) and used hot glue to attach the clock face and decorations to the clock itself.
I used some black puffy paint to make what looks like shingles on either side of the roof, then painted and glued a 3/8” wood dowel (cut to size) along the crest of the roof. This also sealed the gap between my 2 added roof panels. I had some other wood dowels lying around so I painted, cut, and found uses for them as well.
Using scrap cardboard, I made some shutters for the sides of the face opening. Again, here I just used acrylic paints and then puffy paint to make the “shutter” effect. I purposefully made it so the shutters were wide open because I wanted my son to have peripheral vision for walking around on Halloween.
Finally, I made a pendulum weight shaped like a pumpkin and a smaller pumpkin-shaped decoration for the top of the roof. I used acrylics on scrap cardboard and puffy paint for the lines on the pumpkins to give them some depth. I made a “stick” for the pendulum out of scrap cardboard and (after attaching the pumpkin weight) wedged it up in between the brown poster board and the box itself. This allowed me to make the pendulum removable in case it interfered with walking.
Ok, so I thought that was it. I was really happy with the looks of the finished product, and I was almost sure that my cuckoo-obsessed child would be thrilled to wear it. However, that was not the case. I put it on him, he looked at me with a very confused look, and said “off”. It took a couple more times of putting it on and immediately taking it off to realize what was making him dislike it so much: it was essentially resting on his head like a giant headdress. So I took a couple simple steps to make it more wearable.
1. I put some foam in the inside of the roof to create some padding between his head and the roof.
2. I bought some elastic from the craft store and put it at shoulder level from front to back. I just cut a slit in the front and hot glued the elastic to the front of the clock, then cut a slit in the back as well but left the elastic unglued. It was tight enough to support the weight of the clock, but it allowed me to tighten or loosen the straps.
3. I added a strap to the inside of the bottom that stabilized the whole contraption. This went from side to side and was right at the bottom. It kept the clock from swinging about as he walked around with it on.
With these measures in place, we tried it on him again, and (with the help of some distracting M&M’s) got him to keep it on until he was used to it and didn’t mind wearing it at all. It only could have turned out better if we could have gotten him to say “cuckoo” even once on Halloween!!






this costume is so cute, good job you guys.
That a boy Josh. Adam looks great.
Sooo cute! What a unique and creative idea and it looks cute, funny and amazing! Kudos to you on a great well-made costume!
Great job! My son (he’s 4)wants one too! He is obsessed w/ clocks and wants a cuckoo clock costume for Halloween! Thinking of selling or renting out your awesome work? Just a thought.
My son is 2 and also is obsessed with cuckoo clocks, every clock to him is a cuckoo clock. I just ran across this website and I’m so glad I did. I’m gonna try to make one for him this year for halloween unless you wanna sell yours. We are from St. Peters as well. If interested please comment back and maybe we can work something out.
Kim, sorry for not getting back to you sooner. I have not looked at this in almost a year. I am in the middle of making another costume and have taken a couple pieces off of the clock to go on the new one, but it is still close to whole. If you want to borrow it, you can email my hotmail address: jgwdd500@…