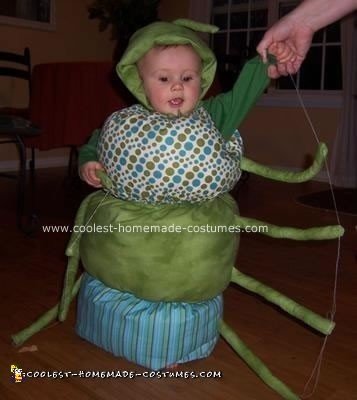
For my son’s first Halloween I wanted to make his costume because I really didn’t find anything I liked in the stores for babies. One of his favorite books is the Very Hungry Caterpillar, which was going to be the theme of his first birthday party so I decided to “transform” him into a Homemade Cuddly Caterpillar Baby Costume. I did not adhere to the color palette of the book, but instead just chose fabric with fun patterns and stayed with mostly green colors.
I had a pretty good idea of what I wanted the costume to look like, but couldn’t find a pattern online or in any of the pattern books. So, I enlisted a good friend of mine and we spent about 8 hours one night planning, sewing and stuffing this cute costume.
Again, we have no pattern to share, but I can list the steps we went through (without the back steps we had to take a couple of times because of “miscalculations”).
I measured my son’s body length, circumference at shoulders and waist and head circumference.
I bought enough fabric based on these measurements, choosing 3 different fabrics for sections to the body. It turns out that the width of a bolt of fabric was the perfect size for the body. We ended up with a little extra fabric on the length, which we decided to use to make a head/hat. I had originally planned for the costume to come over his feet and bunch together at the bottom with a draw string, but decided I wanted his feet to stick out because he was standing independently and just beginning to walk. I didn’t want him confined to this costume with out being able to be mobile (to some degree).
Sewing and stuffing of the body – I sewed all 3 sections of fabric together lengthwise. I made (8) 1 ft (aprox) long tubes and 2 6 inch (aprox) tubes out of left over fabric (same color as the head) for legs and antennae. I stuffed them with plastic bags (for the “crunch” effect), leaving one end open to be sewed into sides of body (and head). With legs attached I sewed body together. I sewed neck and put in elastic and cut corners for arms, hemming edges of arm holes. I also sewed in a lining at the neck and arm holes (used an old pillowcase), this is crucial for the stuffing to stay in and not shift around. I stuffed each section (starting with top) with plastic bags (for crunch) and polyfill.
I sewed elastic between each section, connecting the lining with the outside fabric, keeping the stuffing in one section. I repeated for the next 2 sections. I hemmed bottom and added elastic again for a slightly gathered effect.
The head was a little difficult to measure. I ended up using my son’s hoody jacket as a pattern and just winged it. I stuffed the head/hat and attached antennae to top. It ended up a tad smaller than I would have liked, but being the last thing I sewed at 1 a.m, I decided it was good enough. My son was warm (but not too hot) and comfortable while trick-or-treating. He was able to stand and move around when in the costume and seemed to enjoy wearing it.



Lisa, you did such a good job with this. Carter is very fortunate to have a mom with a great imagination!!!! He’s precious!
Love You,
Bettye
Lisa,
He is so adorable and you did a fantastic job on the costume. I LOVE IT! I don’t have that kind of imangination nor the talent you had for creating it.
Love YA!
Dina
Melissa, it truly was a fun project to do with you. Looking forward to next year’s costume if you’re still living in Charlotte.