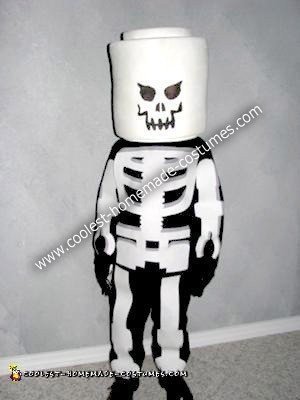
This year both of my boys dressed up as Glow in the Dark Lego Skeletons that I personally made. They both love Legos, and play with them all the time. When it came close to Halloween, I asked what they would like to be, and they each chose their favorite Lego skeleton and asked if I could make them a costume that resembles them.
The Homemade Evil Glow in the Dark Lego Skeleton Costume was made the same, the only difference was size of the bones to appropriately fit each child, and the design of the eyes and smile on the Lego head.
I first began with the heads. I bought a 1” thick sheet of pink Owen Cornings Styrofoam insulation from Home Depot, as well as a spray can of Scotch multi purpose spray glue (this glue does not eat through the Styrofoam as long as you don’t spray at point blank distance). Again I made each head identically so I will tell about just one right now. I measured their heads and found that a 10.5” diameter circle would fit their heads comfortably. I traced 10 circles with a 10.5” diameter onto the Styrofoam sheet for one head. I then traced 7.5” circles inside nine of my circles, so that I would be able to cut out the centers of nine of the circles for their heads to be able to fit inside.
I next proceeded to cut out around the outside of each 10.5” circle. I then had a stack of ten discs with circles still traced inside them. Next, I cut out each 7.5” circle from nine of the 10.5” circle. I set aside one smaller 7.5” circle to use later for the top of the head. Now, I took them outside and used the Scotch spray glue and glued all ten 10.5” circles, putting the one 10.5” circle with no hole on the top.
Using a sanding sponge, I sanded down the outside of the Lego head to make it smooth and even all around. I did the same for the inside of the head only to even things out really. I didn’t spend near as much time on smoothing it as the outside, since I was going to line the inside later.
Now, I sanded down the sides of the little 7.5” circle, slightly rounding the edges on the top, then I spray glued it to the center of the solid top circle on the top of the head. I finished sanding the head by also rounding the top and bottom edges of the head. Finally, I traced and cut out a 9” circle with a 7.5” circle hole, sanded the outside, rounded the bottom edge, cut the 1” thick circle in half (to make a .5” thick circle, I used the other half for the other head), and spray glued it to the bottom of the Lego head.
I needed to cut out the eyes of the Lego head next. To do this, I used a picture of the Lego Skeleton head he chose, and blew it up to the proportionate size, and printed it out. I then taped it to where I thought the eyes should go, and used a pumpkin carving tool (this little orange rolling thing with spikes used to transfer images onto pumpkins for carving) to transfer the pattern of the eyes onto the head. Once transferred, I cut out the eyes, and sanded the inside of them down. I did cut away more of the Styrofoam away from the inside of the eyes to help with visibility while wearing the head.
The hardest part is now over.
I used white foam letters to stick onto the top small 7.5” circle to spell out LEGO. Now I used white craft paint to paint the entire outside of the head with a paintbrush. I did two coats so that the pink Styrofoam would not show through. Once the paint dried, I used Glo Paint spray paint (bought from MisterArt.com) and spray painted the entire outside of the head. I had to be very careful doing this because the spray paint will eat through the Styrofoam if applied to thick. This is also why I used two coats of the white craft paint.
Once the paint dried, I used my Lego face template and traced the nose and smile onto the Lego head with the pumpkin carving tool. I carefully painted the traced nose and smile with black craft paint. Finally, I hot glued white fabric inside the head for a liner (making sure to cut out the eyes). For better effect, I did hot glue stretched black pantyhose over the eye holes. For Halloween though I removed them for better visibility. The head is now complete!
Now onto the body. I started with a black long sleeved t-shirt, and black sweat pants. I used a picture of a Lego skeleton body, and blew it up to proportionate size (this took a couple tries to get it the right size). I had three pictures, a blown up torso, arm and leg. I outlined the pictures with permanent marker to make it easier to trace. I set these aside to use later. To make the bones stiffer, I used heat bond to bond white fabric to another layer of white fabric.
I now used my torso template and traced that onto a sheet of heat bond (it is somewhat transparent). I then ironed this sheet of heat bond onto the top of the dual layered fabric. I did the same for the arm template, and leg template. To make the other opposite arm and leg, I merely flipped the template over and traced them that way (I did hold them onto our sliding glass door to see the lines a little easier for tracing).
Once all body parts were ironed on, I cut out each piece and set them aside. Now I traced another entire set of bones onto the heat bond, and ironed this set onto gray fabric, then cut them all out. The gray set I used to give the bones dimension. Next I peeled off the heat bond from all the gray bones and ironed them onto the t-shirt and pants where I thought it looked correct. Then I did the same with the white bones, except that I positioned them down just a little to see the gray to make the bones look three dimensional. Finally, I used a bottle of Glo Paint (from the same place, this one was not spray paint though) to hand paint the Glow in the Dark effect onto the bones.
To finish the entire look of a Glow in the Dark Lego Skeleton they wore black gloves, and black shoes. It was a little time consuming to create these skeletons, but they looked great Halloween night glowing down the street!



Your comment has been sent successfully.