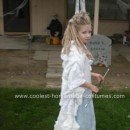
I wanted an Ice Queen Costume. The first thing I did was use Google to get my creative side flowing. The White Witch became my inspiration but I used a few different accessories to make it my own.
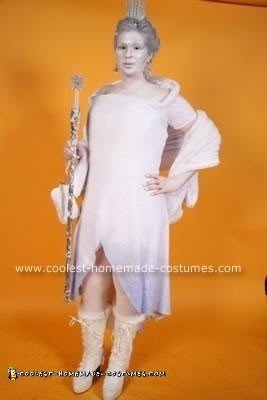
DRESS: I had to have a friend help me make the dress because I am not skilled with a sewing machine but I told her my ideas like using a similar collar to the White Witch and the blue dye job that fades up from the bottom. I wanted to change the dress to be short in front and have a train in the back like royalty and so you could see the killer boots I found. I also wanted the fur wrap like she has. We used a stretchy white fabric to make the first layer of dress and sewed the foam into that to make the collar stand up and added boning. Then died the outer fabric blue at the bottom to fade into the white. Then attached that fabric over the foam parts.
FUR WRAP: Found a lightweight, very soft white fur and cut strips on each end equally sized then folded it and sewed the strips together to give the effect of numerous pelts being put together.
CROWN: Hardest thing to put together for me. I searched everywhere for icicles… Michael’s, Target, Ross, Home Depot, local craft stores, etc. Then I bought some REAL grown crystals on eBay. They are the taller straight icicles on the crown. Luckily, I went to Michael’s once again two weeks later and they had gotten a shipment of icicles that had a spiral and sparkle to them. I bought a small crown from Claire’s and proceeded to hot glue the icicles to the crown. I even broke the plastic Michael’s icicles to make different heights. I then attached the crown unit to a headband so it would sit more securely on my head. When I did my hair, I sprayed it all white with temporary white hair spray and made sure to pull hair over the headband and up around the base of the crown to give the effect that the icicles were growing out of my head :) I also added other sparkly bobby pins and embellishments in my hair and SPARKLES. The photos can’t capture the amount of glitter I had on!!
BOOTS: The boots I found on eBay. They were only $40. I am 6’2″ barefoot and the boots added 5″ and the crown was 6″ making me around 7′ tall! They couldn’t fit me in the picture!! That’s another idea I got from the White Witch… she is supposedly a giant.
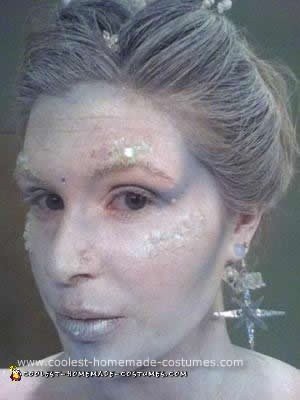
The other crucial part of the costume was the makeup.
FACE/BODY: I used MAC white acrylic paint for my face, chest and arms. Made sure to let that dry well and applied glitter generously to my arms and chest. I used ICE FX on my cheek bones and above my eyebrows. I purchased this from amazon. It is a product they use in movies to create the ice/frozen look. It is basically gel that you apply to your face and stick little crystals onto. It peels off easily later too. I applied jewels to the corners of my eyes going upward and in between my eyes on my bottom lip and on my chin. MAC glitter reflects color: Transparent Teal was added to the highlight areas of my face… cheek bones, inside corners of eyes, above eyebrow, above lip, ridge of nose to make a glistening/wet look.
EYES: I used MAC white eyeliner to line all around my eyes filling in between lashes and working it into my eyebrows. Then I used MAC primer mascara that is white on my eyebrows, brushing them upward and really letting the clumps build up to look like frost. I also used it on my lashes and also dipped the mascara wand in MAC pigment color:Frost to create a sparkle. I used MAC paint pot color:Bare Study with pigment color:Frost for the white parts. The blue parts are MAC eyeshadow in color:Fade to create the shadows under my cheek bones and from my eyes out to my hair line and on the inside ridges of my eyes/nose and my widow’s peak (see photo, hard to explain).
LIPS: I used a moisturizer and applied the MAC pigment color: Frost to give that sliver frozen look. I applied a jewel on my bottom lip in the middle and also dabbed a tiny bit of the MAC glitter reflects only to the middle of the bottom lip.
STAFF: Made a staff from a wooden craft stick from Michael’s, shiny silver duct tape, the same icicles I used for the crown and the spiky ball on top is an ornament also from Michael’s. Hot glue attached the icicles and ornament.
EARINGS: crafted from a pair of cheap dangly earrings that had the clear beads on them. I just attached the sparkly stars that matched the ornament on my ice staff with hot glue.
OTHER: I painted my nails white. I used a small white and silver bag for my ‘purse’. I even got a ‘bling’ crystal phone cover for my iphone. White tights with the fur boots.
That’s about it! Lots of people loved this Homemade Ice Queen Costume and the photographer at a party I went to said I had the best costume of the night!!
Hope you enjoy the look!
Your comment has been sent successfully.