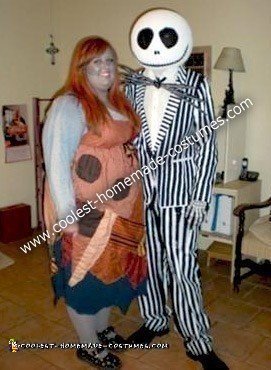
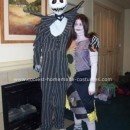
We decided that we wanted to dress up as Jack and Sally from Nightmare before Christmas but weren’t impressed with the costumes sold at the Halloween store, so it was off to make our own Homemade Jack and Sally Nightmare Before Christmas Couple Costume . We started out by making a list of EVERYTHING we needed to purchase:
For Jack:
§ Black Blazer
§ Black Pants
§ White Button up shirt
§ White clothing paint (a LOT of white clothing paint)
§ Paint brushes
§ 2 Styrofoam half rounds
§ White foam paint
§ Black foam paint
§ Exacto knife
§ Black mesh fabric
§ Black foam board
§ White Putty (crayola is light so it worked the best)
§ Velcro
§ Black Ribbon
§ Skeleton Hands
For Sally:
§ Multiple fabrics (different designs, stripes, solids, swirls, plaids and polka dots)
o Browns, oranges and reds
§ Old dress to build off of (or a dress pattern)
§ Sewing machine
§ Grey Long sleeve shirt
§ Blue clothing paint (spray)
§ Red hair color
§ Blue face paint (I actually used 3 different blue eye shadows but we will get into that later)
§ Grey Tights
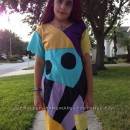
Since I am not much of a sewer we took the dress to my boyfriends mom, who graciously said she would help us out! I cut all the pieces according to Sally’s dress (after looking at dozens of pictures online) and laid them out on an old dress that I used for cleaning, we pinned the pieces and place and let her get to sewing!
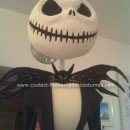
We then started working on Jack, we studied his face carefully in pictures and finally decided we were ready to start. We cut out some pieces of paper to match his eyes, then drew the eyes on one of the Styrofoam rounds, we then cut the eyes all the way out of the rounds to make 2 large holes, we cut the nose next and then painted the entire round white. After that was the white paint had dried and we applied a few more coats to get it as white as we wanted we painted the eyes and the nose black adding a little more depth by creating a small black line around the outside of both eyes and the nose.
We weren’t ready to work on the mouth yet so we moved on to the suite! We started taping the suite using just regular scotch tape (bought from the Dollar store because we knew we would need a lot) and taped stripes on the jacket and pants (this took a VERY long time, way longer than we expected). We could only do one section at a time and then paint and had to wait for the paint to dry before we could move onto the next section, each section took 2 coats of paint and each coat took about 3 hours to dry his suit took me about 3 weeks to paint completely.
The sides of the pants and the under arms of the jacket were the hardest to paint, but all in all turned out pretty good! I had to purchase some ¼ in tape for the collar of the blazer to get the smaller stripes, just taping the collar of the blazer took me about 1.5 hours.
After we had the suite painted it was back to the head and then we just had the bow tie left, I drew on the mouth with a pencil and used the exacto knife to carve just deep enough to make an indent I hallowed it out a bit and made sure to get all the crumbs swept away and then painted it black, after that had dried I painted on the stitching. The front of his head was done! Now all that was left was the back of his head and making it fit.
We painted the second Styrofoam round white and cut out a hole for his neck on the bottom, put the 2 together and realized that his real head was a bit too big, so we headed back to Michaels for some more Styrofoam. We bought a circle of Styrofoam that already had the center hallowed out and cut the bottom off to match the size of the neck whole, we glued this piece onto the front piece of the head and filled in the gap it made with some putty, after the putty dried we painted it white. This fit perfect!
To make the 2 rounds stay together we used Velcro, we cut little indents in one of the rounds and stuck the Velcro in it and then the other piece of Velcro on the inside of the other round and it fit perfect! His Jack head is complete.
Lastly, we have to make his bow tie, this was actually really simple, I made a bat head out of putty and painted it black with little white eyes and fangs. I then created bat wings out of black foam board and connected them to the back of the bat head. After that was done I used a piece of black ribbon to rap the bow tie around is neck and use Velcro to secure it all together.
Now that Jack is done we are back to Sally, my boyfriend’s mom dropped off the dress and it was perfect! All that was left was making me blue and my hair red. I bought a grey shirt from Walmart for a few bucks and some blue spray clothing paint, I took the shirt out back and sprayed it down with the blue paint to give it a blue tint rather than buying a blue shirt. I then used a black sharpie to draw stitching.
To make my face and chest blue I used loose finishing powder mixed with 3 different color blue eye shadows. I dusted over my face after putting my normal liquid foundation on, added some purple to my cheeks for a bronzer and then purple eyeshadow on my eyes and finished off with a finishing spray called Mist and Fix by make up forever. I used a black eyeliner to draw the stitching on my face, neck and chest. Last but not least I sprayed a little red in my hair and we were good to go!
To add the finishing touch to our costume we bought a shirt that could play music that my boyfriend wore under his costume, it played the soundtrack to Nightmare before Christmas all night as we walked around.


I totally love this!!!! I am gonna make myself a costume just like this.
Thanks for posting!