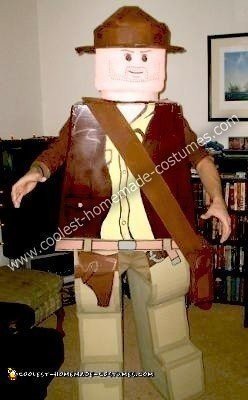
I had seen a number of Lego mini-figs on this site and elsewhere on the web, but I wanted to take the LEGO idea to the next level and really make the costume memorable. After a bit of thinking, sketching, and tinkering, I came up with LEGO Indiana Jones (of video game fame)!
Here’s how I made it.
HEAD:
I’d seen people make their Lego heads out of anything from construction tubing to chicken wire to paper mache, but the best costumes I found had constructed the trademark Lego head out of giant rings of Styrofoam, which is actually lighter, cheaper, and easier to shape. Since the head is such a crucial part of this iconic figure, I decided to follow their lead.
I knew I’d need at least 14″ of mask to cover my big head, so I purchased four sheets of 2″ thick Styrofoam from Michael’s ($7 each = $28). The sheets were each 1′ wide and 2′ long, so when I cut each sheet in half, it yielded two identical 1’x 1′ squares (eight squares in all). I stacked seven of them on top of each other, a bit like pancakes, which gave me a 14″ tall Styrofoam stack.
After stacking my Styrofoam “pancakes” on top of one another, I now had a 14″ tall, seven-layer Styrofoam “cake.” I numbered the layers (1-7), then took the cake and carved each layer (using a regular serrated kitchen knife) into a donut-like ring. Five of these rings were about 11″ in diameter (layers 2-7), and the remaining two rings were about 9″ in diameter (layer one for the neck, and layer 8 for the uppermost ring). It gets kind of stuffy inside the mask, so you’ll be thankful that you cut a ventilation area in your uppermost ring!
When I was done, I glued the layers together (Styrofoam glue works best), let them dry overnight, and then “sanded” the outside of the Styrofoam, using the same kitchen knife, to give the finished product its signature shape and a big, smooth face all around. Then I used a Sharpie to sketch out the face (you can do this freehand or by blowing up a photo of the actual Indy lego head), and I cut out the eyeholes and painted the foam mask. One tip: tempera paint works best, as spray-paint will melt the Styrofoam.
With that, the hard part was over!
Total time spent: 5 hours (3 for construction, 2 for painting)
Total money spent: $35 ($28 for foam, $7 for paint/glue/brushes)
HAT:
Indy’s hat was made without a template, but constructed entirely out of duct-tape and corrugated cardboard, which is wonderfully pliable along the corrugation lines. The “brim” of the hat was just a giant egg-shaped cutout of an old piece of foam core, but you could just as easily use a sturdy cutout of corrugated cardboard for this, too. I had both the foam core and the cardboard already lying around the house, so this cost virtually nothing to make. Once the basic shape was finished, I just had to spray-paint the hat brown. Since the hat was constructed separately from the head, I could easily pop it on or take it off throughout the night.
Total time spent: 1 hour
Total money spent: $3 (tan spray-paint)
TORSO:
Indy’s trapezoidal torso was made entirely out of duct-taped together sheets of foam core. Foam core can be expensive if you buy it new, but I had a bunch of the stuff lying around, and I love this material since it is both sturdier and shinier than your usual corrugated cardboard alternative. The trick with foam core is to always remember to cover any exposed edges because spray-paint will disintegrate any exposed foam.
So, after I had taped it all together, I used spray-paint for the brown base, tempera paint for the beige shirt, and a trusty old black Sharpie for the trim and detail throughout. Again, no template required as I just eyeballed it and did my best freehand version of the same outfit shown on the box art and photos.
I used the leftover brown spray-paint to color the sleeves of an old 3/4 length T-shirt so that I’d have an exact color match for my arms.
Total time spent: 2 hours (1 for construction, 1 for painting)
Total money spent: $3 (brown spray-paint)
SATCHEL:
Indy always wears his trademark shoulder satchel, and I thought this accessory would double as a great way to carry my whip around with me whenever my arms got tired. The satchel was made entirely out of corrugated cardboard and duct-tape; I fashioned the “bag” part of the satchel out of an old cardboard box in such a way that the top “flap” actually folded up and allowed for easy access inside of the thing, which also made for great storage.
Taking a cue from the color scheme of the actual mini-fig, I painted it tan, using the same leftover can of spray-paint I had used to paint the hat.
Total time spent: 1 hour
Total money spent: $0 (leftover tan spray-paint)
LEGS:
The backs and the sides of the legs were made with foam core, again because it’s sturdier. The fronts of the legs were made using corrugated cardboard; because the top of the legs are curved like an actual mini-fig, corrugated cardboard is perfect because it bends so nicely. Each leg slid on one at a time, and were painted using a base of beige spray-paint with tempera and Sharpie details (for the gun holster and belt accessories).
Total time spent: 3 hours (1 for construction, 2 for painting)
Total money spent: $3 (beige spray-paint)
FINAL PRODUCT:
Putting on the costume only took about three minutes. I found that the best way to do this was to slip on each leg, on at a time, first, then slide your arms and head, in that order, into the torso, and finally cap it all off with the Lego head and the trademark fedora.
Total time spent: 12 hours
Total money spent: $44 (might be higher if you need to purchase foam core and cardboard)




Seriously cool. Great work!
Thanks for your kind words! This was a lot of fun to make! :)