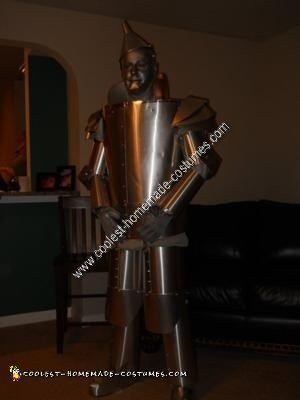
What to be for Halloween this year? That was the question that spurred a marathon 20 hour pursuit for the perfect recognizable costume. It was four days before our annual Halloween party and I still had no idea what I was going to do. My wife finally decided to do characters from the Wizard of Oz. I was to be the Tinman and she was going as Dorothy.
I searched the internet but could not come up with what I felt was a worthy rendition so I did the next best thing, I went to the drawing board. The following steps/pictures will guide you to your very own sheet metal homemade Tinman costume.
I began with a picture I downloaded from the movie. This served as my inspiration throughout the building process. Your shopping list is fairly short but don’t be fooled what the lack of materials will be made up by the amount of individual construction.
The list is as follows: 1 roll of 20″x50′ of metal flashing (Lowes $55), two boxes of 100 8/32 1/2 bolts with nuts (Lowes $12), one roll of pipe hanger (Lowes $5), one roll of aluminum tape (Lowes $9), one large funnel($5), face paint ($4), silver hairspray ($4), silver spray paint ($5), six pieces of poster-board ($6), one foot of small chain ($1).
Tools required for construction: Drill and 1/4 bit, tin snips, screw driver, rubber mallet, marker, poster board, scissors, tape measure,a steady hand and a lot of patience.
I began with making a poster-board 3-d mock up, I made the main body by wrapping a couple of pieces of poster-board around myself and cutting holes for the arms. Then place a piece of poster board over the top and trace the oval shape, remember to add tabs to attach it before you trace it on your metal. Then for the arms and legs simply wrap your upper arm/lower arm, and repeat the process for the legs. Remember to leave about an inch of overlap for the bolts to hold.
Now time for the knees and elbows, the elbows will take some trial and error, simply cut a rectangle big enough to cover your elbow and cut opposing lines toward the middle stopping about 2 inches from the middle. For the knees cut larger rectangles and round out the edges per your taste. The next thing is the shoulder pads simple cut crescent moon shapes 3 for each side, attach at the corners and separate to make the desired shape.
Lastly is the chin and hat (funnel). I held a piece of 2 inch cardboard around my chin and had my wife trace it, then attach the piece to a strap that goes over your head, this is held in place by one that goes over the top of your ear around behind the head.
All these measurements are sized to the individual wearing the suit. Take your time and make your model look just like you want your costume to look. Once that is done, carefully disassemble your poster board model and trace each piece onto your metal. Carefully cut out the pieces and attach them by drilling and using your bolts and nuts. I found one bolt about ever 4 inches works best.
I know this is a lot of information but with a little ingenuity you will have a great homemade Tinman costume. Have Fun.





thanks for the info. my friends and i are going as the group from the wizard of oz but with a horror theme with it
Hi John,
I wanted to thank you for this great description of your process to build the Tin Man costume.
I am going to try to build one of these this year and this will definitely help!
Cheers!
Adam
Can you email me more pics? I want to attempt this next year (2012).
Thanks
Todd
spazimoto76@gmail.com
John – your Tin Man costume ROCKS!
It just so happens that a performing arts studio that I volunteer for is putting on the Wizard of Oz as its end of year production. As the Costume Lead, it is my goal to have our students look as good as – if not better than – the movie characters for their time on stage.
My biggest stumbling block is the Tin Man. Ready to wear costumes are so un-exciting, and poster board won’t give us the satisfying metal clunk we are dreaming of. I can sew like nobody’s business, but fabric won’t do the Tin Man justice.
Just thought I’d ask to see if you would consider renting your costume to us for a few weeks (photos May 7, then dress rehearsals, & performances May 19-20). I’ve searched professional costume houses, and frankly nothing compares to what you have pictured here. We are in metro Atlanta, and I promise that we would take extremely good care of your Tin Man. We do, after all, love the Arts!
Thanks for your consideration. And congratulations on a truly admirable rendition of Oz’s Tin Man.
AKN – amynkn@gmail.com
John – your costume ROCKS! Would you consider renting it for a performing arts school’s production of the Wizard of Oz?
I genuinely appreciate your consideration. Please reach out to me via e-mail (amynkn@gmail.com).
Dear John,
Have you considered making and selling these costumes? My son is in junior high and we are doing the Wizard of Oz this year in April. He has been blessed with the Tinman role. The costumes are awful that are for sale. I would love to speak with you in reference to purchasing this costume or your pattern for making it. If you could contact me at your earliest convenience, it would be greatly appreciated. Thank you for your time.
Sincerely,
Faith
Dear John,
I forgot to leave my email address.
fsaw1616@gmail.com
Thanks,
Faith
Hey, I am going to be the tin man in 2 months, I need to make this suit I’ve got all the time I need to work on it. Can you please Email me more pictures to david92@bellsouth.net PLEASE!?!?! This is VITAL!!! thank you so much!!
Hi there your costume is awesome could you call me at 516 322 5775 as I have some questions regarding this best version of the tinman costume
Rgds. Craig