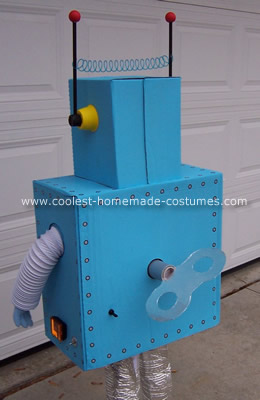
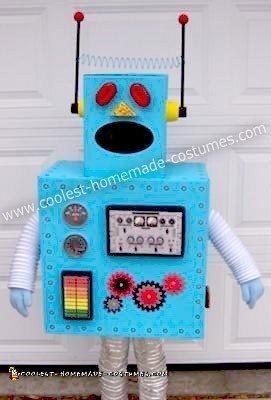
Our daughter loves to make things out of boxes. This inspired her to want to be a toy robot for Halloween this year. We let her pick out the color, and painted the boxes with craft paint. We added rivets around the border with metallic paint. We had fun finding gauges which we encased in the cover from Pringles cans, a control board mounted on the top of a shoe box that we added some buttons to add dimension, and gears we cut out of craft foam and secured with brass paper fasteners.
The ears were made from empty applesauce containers with a dowel, a craft wooden ball, and a slinky to connect them. We used screen on the mouth for her to look through. We used a dryer vent hose for the arms, and pipe wrap insulation secured with Velcro for the legs. We modified shoe boxes to fit securely around her shoe which we cut a hole in top big enough to fit her foot into the shoe. To keep the shoe from coming out, we strung a piece of elastic across the bottom of the box.
My husband added some trailer lights hooked up to 9V batteries. We even added a crank to the back attaching it to the head of a paint roller. We spent a lot of time on the details of her Homemade Toy Robot Costume, and used a ton of hot glue, but it was an overall inexpensive costume!






I think this is the best kids Robot costume ever! Too bad I can’t buy it from you! lol
I am going to make my attempt at it for this year. My 6 year old boy wants to be a robot so badly. Thanks for the help….hope I can make you proud.
:)
i like it so much that i am going to make one for my self. and am an adult…
may I ask what did you use for the crank and how did you attach it to the paint handle? Thanks! This is the best I’ve seen!
We used a heavier gauge of cardboard to cut the crank out. We covered it in aluminum foil. We cut a slit on the end of the paint roller to slide the cardboard crank into. It was secured with hot glue. Hope this helps!