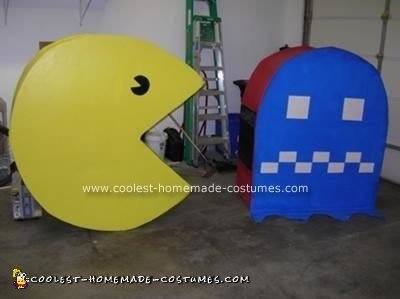
I’ve been working on this Homemade Working Pacman Costume for over a month and a half at this point. Both costumes stand five feet tall.
Three years ago I made a giant Pacman costume, but did it kind of by the seat of my pants. The final product was pretty decent, but lacked fit and finish. It was a huge hit so this year I’ve decided to resurrect it, but make it better. This year’s design will have a working mouth and sound effects built in!
The initial design sketches and CAD renderings are built on the lessons I learned three years ago. I had problems with flex in certain parts of the outer frame, so I’ve added extra bracing to the outer ring as well as to the points that make up the mouth. This prevents the suit from deforming too badly. Unfortunately when I was designing the Pacman suit I forgot to factor in the size of the joints, so in my hasty attempt to work around this I ended up not figuring everything out properly so the frame still ended up somewhat deformed.
The outer frame is made from CPVC pipe. Each side was built, and then I used very short crossbars to attach the two sides together and make any adjustments so that the two sides matched, even if they weren’t as round as I had wanted. After that I installed 24” crossbars and glued them in place. I also picked up some 1” PVC pipe to act as crossbars and mounts for the harness that I would install so it could be worn.
The design concept uses two pizza slice shaped frames sitting just inside the primary outer frame to act as the mouth. Ropes are attached and run through pulleys to close the mouth, and Therabands have been attached to the rear each mouth frame section to act as a retraction mechanism. Once the outer frame was completed I used measurements taken from that to build the mouth frames. I made a jig with screws to bend the CPVC section for the outer edge of the mouth and then a heat gun to set the shape. These frames get covered by solid yellow fabric and black sheer fabric that I sewed together to make a cover for the whole assembly.
It took over a week to get the mouth installed and working properly. There were issues with attaching it, but still allowing the parts to move as they needed to. After that problem was solved I had to figure out how to install the pulleys for the rope. The design used rope and pulleys on one side of the frame, which was working perfectly when everything was still just PVC. It did cause the jaws to torque some, but I could live with that.
Unfortunately when I attached the fabric things started to bind. The extra friction from the fabric along with the twisting of the mouth frames was causing slow movement and the occasional jam. To remedy this I installed another set of pulleys and rope to the right side and ran them over to the left to make one big pull cord. This presented a problem with increased resistance and it was becoming extremely hard to even operate the mouth. The final solution I arrived at was to have two pull cords, one on each side of the suit. Working these together things started to move more freely, but still needed some help. I tried Teflon bike lubricant but it was only good for a few hours. Finally I ended up using wheel bearing grease and things started moving like they were supposed to.
For the center section my plan was to use the same yellow fabric as the mouth. I had Lowes try and match paint to this fabric and it came close, but not exact. Coupling this with the problem of being able to somewhat see through the yellow fabric I scrapped that idea and changed to bleached muslin. Many rubber gloves were gone though on the project because I learned very fast that the glue doesn’t come off skin well. After gluing the fabric on to the center section I discovered another problem.
The mouth pieces weren’t formed quite properly, nor was the outer frame, so they stuck out a little bit past the outer frame in certain position. This was causing the mouth to get stuck on the fabric and totally jam. I had to cut away that area of muslin and came up with the idea of making the cardboard sides larger than the outer frame in the offending areas. I could then glue muslin onto the cardboard and glue it into the rest of the center fabric at a later point.
To attach the suit to a person I picked up an old military surplus backpack with an external metal frame. I threw the backpack away (it smelled) but kept the frame. It did not have a hip belt, so I attached my climbing harness to take over this duty. The harness worked, but was very uncomfortable so I went to REI and bought an actual hip belt that was made for one of the packs they sell. Once that was attached things were much more comfortable, but I had to replace the plastic buckle with a carabineer because the weight of the suit combined with the force required to operate the mouth broke the plastic.
The original idea was to use cardboard for the sides and glue poster-board to the outside so I could hide the nasty seams that the cardboard created. There was some experimenting with how to attach the cardboard to the CPVC frame, and the final solution ended up being expanding foam. It stuck very well to the cardboard and CPVC, but would also wrap around the CPVC to hold everything nice and tight. I did all of this, but discovered that the paint made the poster-board swell and bubble, which made things look terrible. The fix for this was to buy more muslin and stretch it tightly over the sides, glue it onto the muslin for the center section and paint that. Getting the muslin to stretch nicely took some time and patience but after a lot of straight pins and time I got things all attached.
Now came all of the details. The previous suit I had built was very hot, so I spray-foamed in a battery operated fan, and also spray-foamed in the battery-powered iPod speakers. I purchased a track of game play audio from iTunes, and made a loop of the wagga wagga noise that I can play back through those speakers. I also made a little holder in the suit to put the iPod in.
I had continued to do work inside the suit after it was painted. The speakers, fan, etc… and I also spray painted the interior black. I couldn’t spray paint the inside of the mouth sections black because it would have soaked through the yellow fabric, so I spent quite a while and a fair amount of discomfort gluing black fabric onto the inside of the mouth frames. The end result is worth it though because now you can’t really see inside the suit at all unless a light is shooting right in though the mouth. But this work made the outside nice and dirty, so it had to get repainted.
To go along with this I also built a ghost; Shadow(aka. Blinky), the red one, to be specific. But one side got painted dark blue so that it looks like the ghosts when Pacman can eat them. The ghost was built the same way as Pacman, but since I started on it later I was able to avoid many of the small mistakes I had made. The ghost ended up being much easier/faster to build due to its simplicity. The only problem I encountered with it was the fabric I had used for the area where a person looks out. I had used a very fine, see though red fabric, but it was delicate and got torn when it got into a fight with a piece of cardboard. Since it looked like it wasn’t there anyway, I just replaced it with the same heavier fabric I used for Pacman. Thankfully my friend was able to come and help with some of the grunt work on the ghost, so that made things go much faster.
There is some fear of inclement weather this weekend, so to help with that I put down a layer of clear coat paint on top of everything. It is especially heavy on the top so if anywhere does start leaking it shouldn’t be over top of our heads. This design does have a few problems; first there is no way to get your arms outside the suit. This was a conscious design choice, but it does make things a little tricky. Second Pacman weights just shy of 40lbs. Third is vision; the fabric I used for the mouth seemed fine in the well lit garage, but when I went outside in the dark it is pretty tough to see though, especially on Pacman because the fabric is on such an angle. Finally, maneuvering in something this large is tough, especially when you can’t really see anywhere other than directly in front of you.
That’s about all I think I can say about the design/build process of this year’s costume. Hopefully everyone enjoys it, and I’m expecting it to be a big hit this weekend. I’ve seen quite a few Pacman costumes, but never one with a working mouth. I’m sure someone somewhere has made one, but I haven’t been able to find pictures or video of it. It’s been a long time and a whole lot more money than I planned, but the costumes are finally done. They’ll live in my basement and I will probably drag them out again in a few years.
Since I obviously can’t send dozens of pictures into this contest, you can see all of the progress pictures here…
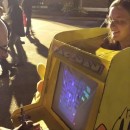
This is of the whole suit operating. It was taken prior to spraying the interior black.


Where did you purchase your battery powered fan?
I’m working on a reindeer costume and need one for the head but can only find computer fans the are hardwired.
how do i buy this
My battery powered fan is just a little cheap piece of junk that runs on four C batteries which I picked up at either Walmart or Target.
As for buying it, unfortunately it is not for sale short of an insane offer.
Wow Great Job ! I am so impressed! My family and I are going to do this for Halloween this year but I’m sure glad we don’t have to compete against you