The setting could not have been more appropriate the first time I saw Nightmare Before Christmas. At seventeen-years-old, I remember stepping out of the last showing of the theater that foggy autumn night of 93′.
My family had yet to arrive to pick me up and as I sat down on the curb to wait for them, I remember just sitting there, thinking –
“My God, That was one of the most amazingly beautiful films I have ever, ever seen.”
As I write this now, fifteen years later, I still stand behind that first impression.
But the topic here today is costumes…
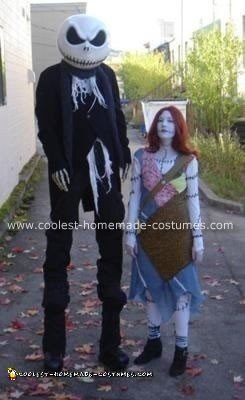
Almost immediately after seeing Nightmare for the first time, I began pondering just how to make a costume of Jack Skellington. No small feat, as his proportions are clearly something no human can represent. I would have probably scrapped the idea instantly if it weren’t for one distant memory from my past:
Once, as a little kid, I was invited over to a friends Halloween party, and as I sat there, enjoying my black-iced cupcake and orange Kool-Aid, a dark figure rose up through the door next to me – It was the scariest Grim Reaper I had ever seen, easily eight feet tall and draped in a black cloak.
Fortunately, it’s attention was elsewhere and it swept past the frightened, smaller version of me as I stared at it, shakingly clenching my plastic star Wars cup and now-mashed cupcake, and proceeded to chase about all the other children there.
What I found out later was that my friend’s dad worked construction and he happened to own a pair of stilts made for hanging drywall, which allowed a person to be instantly two feet taller than normal. So, for example, if Al Pachino strapped on a pair, he would then finally be tall enough to ride the bumper-cars.
So with that in mind, I filed the idea of making a Jack Skellington costume away for the next fourteen years. Every October since, I would begin thinking about constructing it, and then tell myself again “Well… maybe next year.”
Well… last year I finally decided that my apathy was taking on monumentous proportions and I had better build this costume before I grew so old I would be too afraid to strap myself into a pair of 30″ stilts.
One nice thing about not being a teenager anymore is that my income no longer involves delivering pizzas and I now find myself with a little more disposable cash to throw at all the childish projects I never could have afforded as a child. Someone recently asked me – Would I have done it all over again? To which my response was – “Yes, absolutely, but I might have put it off another couple of years.”
The biggest difficulty I have encountered with building this costume was the lack of info on the web. There are a few blogs out there about Jack Skellington costumes, but I wasn’t terribly impressed with them. I had a very specific vision of what I wanted, but still, I was really surprised that no one had really ambitiously tackled this before. After all, you can do a Google search and find the most intricate info on how to build Stormtroopers, Boba Fetts, or Halo characters… down to the exact shade of paint and decals… but virtually none about how to make a Jack Skellington, and after all… he IS the King of Halloween.
So, here is a brief description on what I used. Due to the requests, I really have been trying to get a blog up to fully illustrate the entire process, but you know how it goes – “Well, maybe I’ll write it next year…or the year after that…or…” But in the meantime, enjoy.
Here’s a video of me in the costume:
If you would like to view more pictures of the costume, you can visit my MySpace page…
THE MASK: After purchasing a pumpkin big enough to fit my head into, I used modeling clay to accentuate his eyes and the bridge of his nose. Coated it in a thin layer of vegetable oil (also known as “salad oil” to some), then coated him in layers and layers of plaster soaked cheesecloth, allowing drying time. The cheesecloth gave it some structural integrity and prevented it from simply shattering like an eggshell if it happened to ever hip pavement…which it will…many, many times. After completely dry, openings were cut for the eyes and into the bottom to fit my head in, and the pumpkin was completely cut out, then sanded, primed and painted white. I put two layers of epoxy on it, the kind that comes in quart cans. Hanging freely, I poured the first coat over the top, letting it drip free. After it cured, my friend painted the features, then another layer of epoxy, repeating the process and effectively sealing in the paint job.
After everything was completely dry, I superglued in some transparent black netting over the eyes. Getting this balance is important, you want as much visibility as possible, especially as you’ll be up on wobbly stilts, so spend some time in the fabric store looking through all the fabric. everyone will stop to stare wondering why you keep sticking the fabric over your face.
Lastly, I really wondered how I was going to stabilize the mask on my head, but then, lightning struck again, I put my old skateboard helmet inside the mask and epoxied it in. This stabilized the entire mask, allowing me to pivot my head, and also, it protected my head in the unlikely (i.e. inevitable) event that I would fall over while wearing my stilts.
THE STILTS: Marshalltown Drywall Stilts on eBay: About $200-250. There are much cheaper pairs on there, but these stilts were the ones that best resembled human feet, and as I knew I would be walking (literally) miles in these at night, I figured safety and comfort were going to be big on my list.
*One word of advice, these Drywall stilts take some time to get used to, PRACTICE! They take a lot out of you. But the good news it that much like riding a bicycle, after a little bit of work- it suddenly click. It took me about ten minutes to figure out how to walk in them and then about another two hours to be able to cut loose, jog, walk up stairs, spin around, ect… Keep in mind though, you are up a good 2-3 feet, and if you fall (which you will) you don’t just stumble and land your butt on the ground…no, you go down like a redwood tree does underneath the wrath of a chainsaw- a long…straight, no knee-bending, shoulder-rolling flat out free-fall…just BAM! TIIIIMMMBBBEEERR!! So if you’re old, frail, brittle, sane, or are one of those people that tends to trip over every crack in the sidewalk, I really don’t recommend this costume to you…I might instead suggest another costume, perhaps one involving large quantities of foam.
* One other note about the stilts, when I first got mine, I went to the local park and practiced in them while walking in the wood-chips in case I fell. It was then that I came to the conclusion that- upon seeing an eight-and-a-half-foot-tall man clumsily walking around the playground- small children tend to fall into two categories. The first (and largest) group of them are the ones that absolutely cannot get enough of the sight of you, and think it’s the coolest thing since sliced bread. It’s actually a little distracting having them staring wide-eyed and following you around though because as you’re still a little shaky- you don’t want to land on them…parents tend to frown upon a flattened child. The second group of children however, are the ones that are straight-up, COMPLETELY TERRIFIED of this gargantuous freak of a person that has just invaded the sanctity of their playground…(FLASHBACK TO – My own childhood experience years earlier). Fortunately, the parents were always completely nice to me, I suppose they also understood that I probably needed the safety of a soft bed of sawdust to land on at least as much as their children do.
BOOTS: Just a small touch, I found a pair of these children’s electronic toy “boots” from Disney’s “ROBOTS” movie, they basically go over your shoes, and I found they fit over the drywall feet perfectly, painted them black and put them over the stilt feet, secured with electrical tape.
TAILCOAT: A traditional English butler’s coat I bought on eBay, Theatrical enough to fit great with this costume, but actually, just enough on this side of crazy that I’ve been getting away with wearing it all fall anyway in my street clothes.
GLOVES: Skeleton gloves I got from Vampfangs.com. Cost about $25.
MISC: Odds and ends from various places, paint, epoxy, elastic, plaster, cheesecloth, modeling clay… I just salvaged what I could, and was not even sure how I was going to accomplish certain aspects of it till I got there. But like with so much else in life, the solutions tend to present themselves as you go along. And also, it’s true I used a lot of time and money on this that I probably could/should have spent on more responsible grown-up things. But the way I see it is that I really don’t think I’ll be looking back on this fifty years from now and say to myself “Man, why did I spend all that time and expense on that costume when I could have been cleaning my rain-gutters and purchasing a set of all-season, radial tires instead!”
So there it is – And whatever it is everyone does decide to do each October 31st, please take advantage of the fact that we live in a culture where – on a certain night every year – it’s perfectly acceptable behavior to dress up like a Bikini-Clad, Poached-Egg on Roller-Skates, and then go pound on all of the neighbor’s doors demanding candy.
Trick or Treat!


The best one I have EVER SEEN! AMAZING!
this costume is great!! But I would make a pair of long trousers to go over your stilts since it looks like you have 2 pairs of feet. just a suggestion.
Your guide has pushed me off in the right direction… Thank you for the in-depth guide!
wicked costume.ive been rattling my brains how 2 make the mask.think i better get a move on with it.cheers
Dude…that is really a great ensemble you have put together! I always admire people with a passion for art and theatrics! Thanks so much for the tutorial. I plan on building one of my own this year.
Happy Halloween!
That.was.amazing.
expensive but well worth it. I love making my costumes each year and know how time consuming it can be, im sure it took you a good amount of time too, you were very thorough and did an awesome job!
Would you be willing to sell the Jack Head or make me one? I would pay you of course….
Great tutorial! Thanks for the vast info. You inspired me so much that I (with my wife’s help) made a mask and costume. I’ll be posting it shortly. Thanks again!!
Great job, I am inspired and am working my head now. My search for just the right pumpkin took me far into the Manitoba countryside. Thanks for sharing such great information on your creation!
Cheers, Jim