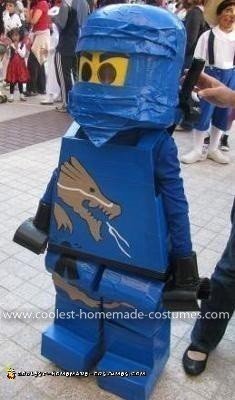
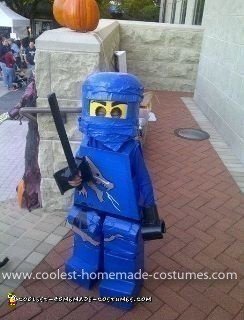
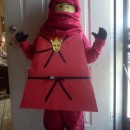
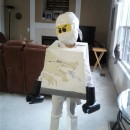
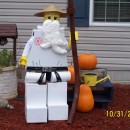
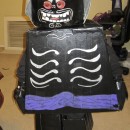
When my son told me he wanted to be Lego Ninjago, I knew I had to start brainstorming. Thanks to this site and other online resources, I was able to take ideas here and there to make his Homemade Lego Minifigure Ninjago Costume. He entered a local contest with this costume and won first place for his age category this year.
The Ninjago costume was made with mainly Dollar store items with the exception of duct tape and Velcro.
For the head, I used a small Dollar store plastic laundry basket and a big plastic bowl that also had a rounded edge at the bottom of the bowl. Since the basket was kind of flared, I cut slits down the basket and retaped to make it more cylindrical. The laundry basket had a rounded edge to it already. Then I cut the rim of the bowl away and fitted the bowl over the open side of the basket. Note when buying the bowl, it should fit over the laundry basket.
I then cut an opening on the bottom of the laundry basket to fit his head in. Afterward, I duct tape the whole thing inside and out with blue duct tape. Then I cut and opening for the yellow part of the face. Eyeing the actual toy and trying to get as proportional as I could. I used a poster board and cut it a little larger than the opening. Taped it with yellow duct tape and then cut two black circles for the eye with black duct tape.
Afterwards I cut the eyes out and made sure to leave some black to outline the eyes. I also added the eyebrows to it at the same time. I did not want to cover up the eyes with netting, just to allow more air in and make it easier for him to see. Then tape the yellow part to the head piece from the inside. I also cushioned the inside of the head piece with foam to level it where his eyes would be and also stabilized with a strap made of duct tape and added Velcro.
Then I made Duct Tape fabric and bunched it up and attached to the top of the head and also bottom of the head to made it look like a ninja head cover on him.
For the body, again trying to eye the proportions, I used foam core and duct tape. The dragon was also put on by using duct tape and cutting out the pattern for it. The leg was also mainly made of foam core and I also made sure to make the top part of the leg and bottom part of the leg so that it could bend when he walked. I placed a middle zone between the two parts that consisted only of duct tape fabric (about 6 inches). Once the two parts come together just fold the duct tape fabric so that two parts meet. That allows for flexibility.
I also added duct tape suspenders to the legs to stabilize it for when he walks. I decided not to do the arms for ease of movement, so I found a blue shirt that was as close to the color as I could. The Lego hands were made of 4 beer can coolers. The wrist part I cut and retaped to fit his wrist, being sure to leave enough room so he can slip his hands through. The claw part was done by cutting it in half and leaving it as is. I then inserted the wrist part into the claw part by cutting a hole to fit.
Afterwards, I taped the whole thing with black duct tape. The foam sword I purchased at a Dollar store and just retaped with black duct tape. The proportions of the head to body to legs was done by eyeing. I did measure the actual toy too, to try to proportion the best I could.
My son really enjoyed this costume and I enjoyed making it. It took about 3 weeks to finish, but it was usually maybe about a few hours here and there after work and on weekends.


Great costume. Your a great mom!
This is truly amazing! Love the costume! It looks as though it took great patience on your end to get all the details just right. And it totally paid off. Your son must have been the hit of the night!
Thanks for comments… he was a very happy Jay that day! :)
Love it you r soooo clever
My son wants to be Zane for Halloween so I’ve been looking online for ideas. Yours is the best looking I’ve found. I’ve been reading your how-to instructions but I’m curious about how much this cost you to make? You mentioned foam and if you mean the foam to make seating with that can be expensive. Just curious. Thanks.
Let me start by saying AWESOME!!! and thank you for the tips I am going to attempt this for my son I was wondering if you can give anymore details on how to construct the legs and how is the back constructed you mentioned velcro. Thank you
Wow! that costume is awesome! Can i pay you to make a costume like that for my son? He wants to be Cole, and I have had no luck finding a costume until I came across these pics. Let me know
Wow! that costume is awesome! Can i pay you to make a costume like that for my son? He wants to be Cole, and I have had no luck finding a costume until I came across these pics. Let me know
I would like to make my son a costume of lloyd garmadon for halloween this year, honestly he wants me to but I’m up for the challenge! however when I went to read the description of that home made costume ( which might I say looks AWESOME) there was a Toyota ad covering up almost the entire entry, UGH! I can’t figure out how to bypass it or disband it, I tried to copy and paste the words but the Ad would not let me cross through the Toyota banner. I’m going to have to custom make this outfit from scratch and I was hoping someone could pitch me a few ideas so I can manufacture a near replica of the green ninja. Please contact me if you got the time: hungwelldrywall@hotmail.com
Love, love, love it! My kids are begging to be Jay and Kai an I was totally stumped until I saw this! Thanks for the great ideas!
I am making this costume and I’m confused on some steps can you please email me at joeys_gurl82@yahoo.com
THIS COSTUME ROCKS!!!!I would love to make this same costume for my son Jay :-). Can I call you with questions? Please email me and let me know. Thank you! jenliebhart@yahoo.com
Would you be willing to make one for my son for Halloween? Of course I would pay. Email me if you are interested… chell0909@sbcglobal.net. :)
awsome idea, I am always up for making halloween a challenge. But i nee more detail with the legs and also the back of the costume. what kind of foam is it, not to sure where to buy. can you email me some details please..
I REALLY LOVE THIS… My son told me he wants to be Jay the green ninjago. I have nunchicks so far. But all the other sites of seen on lego ninjago costumes (pardon me) but they suck…. I would pay you and pay for shipping. Jay is the Green One. He is totlally obssed with him. I love what you have done. I will Pay 50 to 100 dollars to you for this Please let me know… I have been searvhing and searching and cannot find anything
My home number is 474 739 0585
Address 1811 Bunker Hill Dr.
Or if not maybe just moe basic simple step by step direcions. LOL. Either way let me know
You can contact me on Facebook @Digi Girl Erin Parochka or mail Erin Parochka 1811 Bunker Hill dR. Van Buren Ar. 72956 …. Email: Emaginemeforever@aol.com
Look forward to hearing from you and my son would be sooooooo happy!! :)
Jay is actually the blue ninja and Lloyd is the green ninja. I thought you might want to know so that your son wasn’t disappointed.
This is a fabulous costume- you did a wonderful job and your son is so lucky to have you as his mom. My son wants to be Jay this year as well and like others I haven’t found anything that I like so we’ll make the costume (this is the same son that wanted to be a blue Mini Cooper 2 years ago- that was fun, but a TON of work too). I have questions on how you specifically cut and constructed the foam legs and body piece and how they all fit together. I think the rest (head and arms) I understand. I would greatly appreciate it if you could please email me at kristibaxter@yahoo.com with any additional instructions. Thank you!
I have not looked at the site since last year until now. I appreciate everyone’s comments and will try to return everyone’s email and answer questions.
The foam that I used was Foam Core Boards, the ones kids used for projects. For the cushion inside the head piece you can use either pillow stuffing material or foam cushion. The cost of the project was about 30-40. I got most of my supplies at a nearby dollar store, with the exception of duct tape and velcro.
The legs took some trial and error, since i had to make it so that he could walk and sit down with this costume. I would have to take some detail pics of the leg to give you a better explanation.
Again, Thanks for all the comments.
Mindy
I am in complete awwww….please post any helpful hints to this site. I am going to try to tackle this as well for my son.
VERY VERY CREATIVE!
I too would appreciate your help with more details please… kmpminn@gmail.com
I would love to see this costume step by step on the website instrubtables. That is usually my go to spot for awesome Halloween costume how to’s. would you consider it? That way you don’t have to be bombarded with all the questions for clarification.
Just wondering how you did the top of the legs(where they meet the body)? I noticed they were rounded. Also did you leave the back open so he could sit down? And what did you use for the shoulder piece? Was there foam board in there too?
I WOULD LIKE TO ORDER 2 COSTUMES FOR AGE 6 BOYS. COULD YOU KINDLY CONTACT ME AT JENWANGFANG@GMAIL.COM
THANKS!!
if you are writing back to people with more pictures and details, please include me in on
that too.
this is AWESOME!
thanks
Hi Everyone,
I am working on taking some detailed pics of his costume, front and back… Will take instructables as a suggestion, but Unfortunately did not have step by step pics of what I made, unless I make another one from scratch… which would be too late for this year :-) I am sorry that I won’t be able to fulfill any orders of making the costume… would be overwhelming with a full time job and three kids… I would have loved to do it!
To answer a couple of the new questions, the curve on the leg is done by scoring the foam core ever 1/2 inch then bending it to a curve. I basically did the back part where his bottom was going to sit and bend without any foam core… basically making a “duct tape fabric”, you will see once I post more pics. Again, Thanks everyone. Will try to get the detailed pics by this weekend.
Mindy
Hi,
…i forgot to ask..
How did you make the top part of the leg? Materials/how did you attach it to the body/if not how did he keep them on? Thanks again,
Caitlin
umrosec@gmail.com
First I want to tell you that you did an amazing job on this costume!! Ive been searching on how to make this costume..I for a week and finally came across this. My son wants to be Loyd the green Ninjago. I am a little confused on how to do the legs. Would you please email detailed instructions on the legs. I would appreciate it so much! Antsmaa714@aol.com
This is awesome. you really inspired me. I’m about to go to the Dollar Store to get the materials :)
I also would like to get more details about the top of the legs. Thank you so much
Truly impressive!
If you are writing back to people with more pictures and details, please include me in on this list. tammy@com2meida.com
I was wondering if your son had a hard time walking or going up and down stairs.
Thanks
I was so worried when my son came home proclaiming he wanted to be the green ninjago. Can you please email me pictures of the legs, that is really the only thing I’m worried about making. Thanks!
txnl8y@gmail.com
Wow you are amazing!!! thanks for letting the rest of us know how to make this costume! my Godson has been begging me to make him a ninjago costume until now i had no idea what i was getting into…=)
thanks for saving me
Amazing!
If you are writing back to people with more pictures and details, please include me in on this list. tamlc@mac.com
I was wondering if your son had a hard time walking or going up and down stairs.
Thanks
Not sure how to add on to this post the extra pics. I guess I would have to do another submission, but for now, if you are want to see the close up pics, please post your email. Tammy I tried to email you, but it did not go through.
Yes, my son needed my help to go up and down the steps, but walking on the flat sidewalk he was fine.
Amazing!!! I am in awe almost as much as my son.
So creative!!! Thanks for posting pictures and directions! My sons are thrilled!!
You have amazing talent. This is the most awesome costume I have seen. so cool that I want to go as Mia with my son the green ninja!
I would greatly appreciate it if you could send me pics if you have gotten around to taking more. Or maybe a pattern? Plz anything will do. Thanks in advance!
Kimpossibleswag@gmail.com
Please add me to your detailed email. Boofiejo@yahoo.com
Hi ,mindy this is was amazing and inspirational! I too would love to see the back pictures. Semidawgs12@yahoo.com
Thanks!!
Dear Mindi,
Could you please e-mail me any other pics you have if you have the time? My 6-year old boy and I love the costume!
My e-mail: marthalippi@hotmail.com
Thanks!!!
Does anyone know what duct tape fabric is? Is that just duct tape or fabric taped with duct tape?
Thanks!!!!
What a great costume! I’d love to see more detailed pics of the legs if you have them. jennifer@kosich.net
thanks!
Will you send me more pics too please if you get the chance? Your costume is AWESOME!
Thanks!
Hillary
jhdivis @ gmail dot com
Hi! This costume is exactly what my son wants to be. Please email any additional Picts you may have on costume. Thanks so much!!!! Mgab@optonline.net
Hi there! We are totally copying your idea for this Halloween! I would love to have pictures please! What a wonderful job you did!
a.kromrey@yahoo.com
Thanks!
Lovely Costume if yo have any other photos to share it would be a great help. Ladyimage_23@yahoo.com Thanks again
HI Mindy,
I would greatly appreciate it if you would also email the pics. My email address is twill23211@aol.com. Your Ninjago costume is by far the best one that I have seen. You did a fantastic job!!
Thanks so much!!
tania
great costume! will you be showing how you made duct tape fabric so that it doesn’t become a sticky mess???
Mindy,
Thank you for posting this. It is great. I am starting tomorrow on my son’s costume. Any pictures you could send me would be very much appreciated. Did you freestyle the emblem?
Thanks so much.
carolrau326@gmail.com
I’m in the process of making the green ninja so if you could send me any pictures it would be greatly appreciated :)
a.kromrey@yahoo.com
Thanks!
Could you send me some more pictures too.
Great costume.
Thanks so much.
Carolrau326@gmail.com
Could you send me some more pictures too.
Great costume.
Thanks so much.
Carolrau326@gmail.com
Please send me the additional pics too. Great job on the costume. lori.vance@lexisnexis.com
Hi! This is super cool. My 7-year-old son wants to be the black Ninjago this year, and I am not nearly as crafty as you. Did you paint the dragon logo or print it out? I would love to be on your email list for pictures. Please include close up pictures of the legs, if you have any. Those are super realistic-looking. My email address is sfox@publicityink.com
Hi! I appreciate everyone’s comments and am overwhelmed by all the wonderful responses. Thank You So Much! I have been returning emails and have had a couple that bounced back as invalid emails. If you have not received an email and still need the extra help or have questions. Let me know. Thanks.
Mindy
Can you please email me the Instructions? I love this! Andrea.mar.trujillo@gmail.com
Hi, I’d love some more pictures. Attempting this for my 9 yr old. Thanks in advance,
tommychillemi@yahoo.com
I hope its not too late to get on the email list for instructions. Please send them to me, this costume is great! My 4 year old really wants to do this for Halloween. my email is thomas.carver50@yahoo.com. Thank you
This is awesome and I am starting today! Did you do the foam board for the back of the legs and torso also? Also, what did you use the Velcro for? My son loves Kai, so I am now the proud owner of a lot of red duct tape! Thanks for sharing. My email is dkeppinger@yahoo.com. I would love a response on what you did with the back and Velcro. Also was your son able to sit in it?
Thanks!
Denise
Hi, Thank you for trying to email me. It would have helped if I typed in the correct address. If you do check this again, I would love additional photos. tammy@com2media.com
Thanks. Again….. wow!
I would love more detailed explanation as well. Please email:
Lbetskal@hotmail.com
Thanks in advance for your help!
This costume is rad! I got some of the needed supplies today at Home Depot and would love more detailed pictures and any pointers. I’m going to build a green one for my five year old son.
Shadstoltz@gmail.com
Thank you in advance!
Would you please include me on your list of pictures and details? I am putting this costume together for my son and I am having a lot of difficulty with constructing the legs. The rest of the costume has gone remarkably well thanks to your original post. Thank you so much for your ideas! My email: meblanchard@myactv.net
Could you send some more detailed pics of head . Thanks
I could use some detailed pics and instructions for the head. bthorby@comcast.net Thanks
Please send any extra tips And pics to me. This is great! Thanks!
darrenswunlv@yahoo.com
I love it! Any more pics or tips would be great thanks!
b2webber@yahoo.com
This is amazing! I’ve been trying different ways to make this until I came across this page. Could you email me the extra info? bohannonmf at gmail.com
Thanks!
Great costume! I think I did it mostly right, but struggling with the top part of the legs and where to fasten them to as well as the suspenders for the legs or however you did it…please email instructions and additional pics if you can. Much appreciated. s_misko@hotmail.ca
LOVE the costume, my 7yo also wants to be the blue ninja- Jay. I have done a decent job so far on head/body, but really need some help with legs- could you please email me pics too…thankya
newhanovermom@yahoo.com
This is amazing! I know we are starting late but I would love some more detailed pictures to help us out, too. My email is b2webber@yahoo.com. Thanks!!!
Hello! hope it’s not too late! The hubby and I are going to attempt this week and weekend. Please send detailed instructions to fonso.tafur@gmail.com!!! WONDERFUL JOB!!!
I am interested in more direction if you have it for me to make the costume. Would be much appreciated. mw_residents@yahoo.com
How did you color the foam? Everywhere else I read it says spray paint will eat it up, which is what I bought to do my son’s. He wants to be Kai and I already have the body made from white foamboard.
This is amazing! I am working on one for my son but am struggling with the top part of the legs and where to fasten them to as well as the suspenders for the legs or however you did it…please email instructions and additional pics if you can. Thank you! am_walton@yahoo.com
Mindy, it’s just amazing. I’ve been working on it quite a bit all week. I have a question… Did you leave an opening in the body to get it on him? Any pictures from other angles would be great. Thanks o much. Lbdem@hotmail.com
I did not use any spray paint in the costume. Duct Tape was used for all of the coloring in the costume. All the other materials included a small laundry basket; halloween candy bowl, foam core, velcro, stuffing to cushion the head piece and poster board for the face part. Most supplies were purchased at the dollar store, and the rest either a hardware or craft stroe.
Can you please send me instructions for the legs please?
Thank you in advance
mkmasg2yahoo.com
I have also been challanged by my son to make the green ninja. I have been researching all morning and would love to have more pictures and details especially for the legs.
Great job!
Sorry, I forgot to give my email address. It is jadalex8@embarqmail.com
Thanks again
Love your costume!!! I’ve been working on one myself and used your idea for the head, but we are having difficulty. How did you keep the laundry basket from wobbling around? Please let me know: jennifercgomez@gmail.com. Thanks
Thank you for sharing your costume. I made one for my son this year and used your costume as inspiration! It turned out great.
would you be able to make one for my son… ofcourse i’ll pay you. email me please reynaann56@aol.com
What wonderful ideas!! You did a terriffic job. Your son is very lucky to have such a hard working Mom. My son loves Ninjago and wants to be Zane for Halloween. Thanks for the good tips!
If it’s not too late, would you be able to email me the additional photos? I think I understand the head and body portions, but can’t seem to visualize the legs with the duct tape fabric between pieces for bending. sarahjainsworth@hotmail.com
Thank you! You did an awesome job!