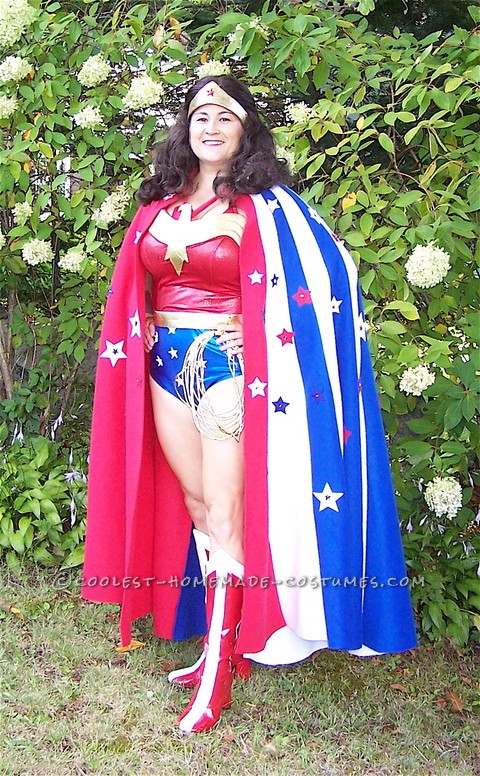
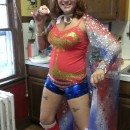
Here is my head-to-toe rundown of how I made my *NO SEW Wonder Woman costume. (*no machine sewing, but some hand stitching. The hand stitching could easily be replaced by using Liquid Stitch.)
The Hair:
I hummed and hawed about buying the wig, but it definitely adds to the look of the costume, especially since I have very un-Wonder Womanly baby fine, golden hair. The wig was purchased on-line and is called “Secret Wishes” Wonder Woman wig. It is of good quality for a costume accessory wig. Inside there is an elastic to help with sizing for smaller heads like my own.
Tiara: I made a tiara template out of poster board, then traced it onto a piece of adhesive-backed felt. I carefully applied a piece of gold lamé fabic to the sticky felt, cut around it leaving enough to wrap over the felt and glue to the back. The whole backside of the tiara was then covered with another piece of adhesive felt to cover the rough edges and add comfort. Velcro glued onto the ends provides the method of attachment around back (the tiara also helps hold the wig on). One applique star adorns the front of the tiara. I covered the star in spray glue, then sprinkled very fine powder red glitter onto it, and stitched a small, red acrylic star onto the very center. I glued the star onto tiara (masked off the star shape with painters tape so that excess glue would not seep onto the gold, and removed when dry).
Red Satin Top: I purchased a Leo’s Red Satin Stretch basic ballet leotard, with sweetheart neckline from a discount dance wear company online for fairly cheap money. (~$25 +/- ) Unfortunately, this particular line of leotard has been discontinued, so don’t bother looking for it. I needed extra support, so to cover the elastic straps of the bra I had sewn into the costume, I added a satin halter strap. (halter strap made out of an old satin belt that came with one of those frilly Valentine’s day outfits).
Making the Gold Eagle:
I found a comic book version of the eagle that I liked the best, printed it out and used it to draw my template. Each piece of the eagle was assembled in the same manner as the tiara. The five separate pieces were then butted up against each other to give a quilted effect and glued onto a matching piece of red satin fabric. I folded the red satin around to the backside of the eagle to hide the raw edge and glued it in place. I left about 1/8 of an inch of red satin showing around the perimeter of the eagle and hand-stitched it onto the front of the red ballet top.
Eagle in progress…
top: drawing of design;
Middle: Poster board template;
Bottom: Mirror image of templates in adhesive backed felt.
Making the Blue Britches:
Royal Blue Metallic cheer leading briefs from online dance wear company. White stars purchased from JoAnn Fabrics and hand sewn onto briefs. (FYI: Can’t iron the metallic fabric!!) I suppose Liquid Stitch would have worked also, but I wanted to be able to move my stars if I wasn’t happy with their location after the fact.
Running Sneakers:
I purchased some inexpensive red lycra booties that go over ice skates. I slipped them on over the running sneakers, glued some heavy duty black vinyl to the bottom to create a sole, and glued soft white felt up the center for the boot stripe. I made a pair of shin guards, for lack of a better term, out of red vinyl to create the boot tops. The front has more of that heavy duty craft felt to create stripes. I punctured the back side with a hot awl to make eyelets. They lace up the back with a matching red cord.
Making the Belt:
A simple length of gold vinyl trim. I intend to made a more elaborate belt that ties in with the eagle better. Lasso: Gold metallic cording. Both from same fabric store. Lasso Hook: Flat piece of metal from my cellar, shaped into a hook and covered in the gold that I made the belt out.
Bracelets: Two layers of aluminum flashing from hardware store. Each layer was adhered to the other via Manco Indoor/Outdoor Double Sided carpet tape (one layer of flashing was too flimsy). Carefully cut metal with tin snips, stick layers together, then file down the rough edges and shape around wrists. It helps to use a large wooden dowel or other round object to start the shaping process, and remember to taper as you go. Cuffs are lined with adhesive fun foam for comfort and adorned with red acrylic star.(Superglue…holding so far).
Boots: Well, when I found these babies online, I couldn’t pass them up. They are Go Go boots made by Funtasma (GoGo305RW.) If you have thin calves, you’ll be all set. They are quite narrow on the lower leg, and though they say stretch, I read lots of reviews by people who had to return them. I am also making a pair of Wonder Woman sneaker/red vinyl shin covers to wear in a 4th of July parade. I will be hula hoop dancing in the costume and boots are not conducive to my stability. Golden Hoop of Truth pending.
Cape:
First off, I chose to make my cape out of a light weight fleece, not the proper satin, for three reasons. 1) this is a practice run before I do it in the satin; 2) The fabric is super easy to work with, since it doesn’t fray (and doesn’t required finishing all of the outside edges; and 3) I will be running a 5K in the costume, in chilly Autumn in Boston, just before Halloween, and this will act as a warm cloak for pre and post race…
I had a little knowledge as to the basic shape I needed to work with, but had never actually made a cape before. I cut up several lawn / leaf bags, laid them out on my patio, taped them together to made a giant piece of paper and proceeded to make my own pattern from that. I measured the distance from the nape of my neck to the ground to estimate how long the cape would need to be, plus extra for hemming. I tied a marker to a string, and anchored the string down where my neck would be. The length of the string was equal to the “nape to floor” length. I then swung a huge arc using the string/marker like a giant compass to create a huge 3/4 circle. (Think Pac-Man with his mouth wide open, pointing upwards.) I divided up the the shape into two halves….the “Red Side” and the “Stripe Side”. The Red Side was split into two large equal sections. The Stripe Side” was split into multiple wedges of varying sizes. The three blue/white/blue wedges closest to the red side are much wider and take up half of the striped side. The remainder of the striped side gets split into 6 narrower wedges of blue, white and red. Once I got that all figured out, I cut out the different sized wedge shapes that I needed and matched them up with the the corresponding fabric color. Without going into gory detail, I stitched all of the wedges together, cut a semi-circular opening for the neck hole, hemmed the neck opening and threaded a piece of long fleece through it for the tie. I put it on and shortened the bottom accordingly…trimming a few inches off of it, testing it out, making adjustments as needed. When I was satisfied with the length, it came time to “bling it out” with stars, sequins and beads. Instead of buying expensive applique stars for a fleece cape, I opted to pick up $1.99 sheets of heavy duty craft felt. I soaked each piece of felt in a little soapy water to remove the sizing and make them a little less stiff. I found different sized stars to trace onto the felt, and cut out. Each star was then adorned in the center with a large sequin and a gold seed bead similar to the actual T.V. show cape…(I put an acrylic star in the center the biggest ones…the sequins looked too small on them.) Once they were all ready, I carefully glued them in place with Fabri-Tac. I did not try to follow along with the actual cape for positioning, but did use it as a general guideline. An incredibly help website for the making of the cape is the “Wonder Woman Museum”, specifically “the Mannequin Project” page. Lots of photos!! When I get brave again, I will venture forth and try to do this in satin.
Video:
I performed a “hoop dance” routine in a local 4th of July parade, dressed in the Wonder Woman costume. I had to nix the Golden Lasso for my Golden Hoop of Truth (which I also made myself…irrigation tubing, gaffer’s tape and gold spray paint.) I had to make a set of boots specifically for the parade dancing/hooping. I would have killed myself in the heels. So the boots are flat bottomed, rubber soled, faux red boots and I painted the stripes on. Lastly I had to switch out the top with a second one. I made it the same way, but used a body suit that is red metallic lycra, instead of half satin….something that could better move with my body.
I picked out music and choreographed the routine. Unfortunately, the routine is designed to be viewed specifically from the sidewalk, so you totally miss the optical effects of the cool tricks.. (My only video was taken by my husband who was behind me in the parade pushing the cart with my water, towel and music. He was being a good sport dressed as Steve Trevor.) Aside from the wrong angle, the video is kind of fun. You get to be in the parade with me, and hear the crowd cheering, etc…
Have fun watching!
http://youtu.be/rSvVc4AT0wc

Fantastic job!!
Awesome costume!
Fantastic job!!
Awesome costume!
Very Super costume! And a very detailed and well written instruction guide : ) Wonder – ful!
Very Super costume! And a very detailed and well written instruction guide : ) Wonder – ful!
This has to be the winner. Pure creativity!
thank you!!! (I didn’t win, but thank you anyway!) :)
This has to be the winner. Pure creativity!
thank you!!! (I didn’t win, but thank you anyway!) :)
Awesome instruction. Great photos. Most importantly, the BEST COSTUME!
thank you!! :)
Awesome instruction. Great photos. Most importantly, the BEST COSTUME!
thank you!! :)
Wow! Amazing hoop skills and great ideas. This town is so Americana- love it
thank you! :)
Wow! Amazing hoop skills and great ideas. This town is so Americana- love it
thank you! :)
Simply awesome! I’m planning a victorian/steampunk Wonder Woman, but am having difficulty in finding appropriate footwear (I’m overweight AND have a triple wide foot. Your sneakers are giving me some great ideas (and they’ll be a lot more comfortable at a convention.
So happy that my foot wear ideas have helped you! I haven’t checked in here for a while and had no idea anyone had even found my stuff!
Oh another thought…There are LOTS of faux suede red boots out there (amazon.com)….flat soles, many sizes. (I have learned to buy a size bigger than I need and add cushy inserts.) The ones I used in the parade video, I simply glued white fabric onto the red with fabric glue. I folded the top of the boot into itself to create a point in the front and tacked it in place with fabric glue before adding the white stripes..
what an awesome hoop routine. so fun!
OH Thank You!!! I was terrified, but my husband was with me pushing my water/music cart. (dressed as Steve Trevor). LOL It was 97 degrees and SUPER humid…I had on that wig,which was like wearing a winter hat. I did that routine about ten times in a row, for the hour long parade. I planned short breaks in between with slower music so I could towel off real quickly, guzzle some water and catch my breath. The biggest obstacle was not knowing the parade route, i.e. how narrow the streets were going to be in some places, or the giant hill I was at the very top of when it came time to send the hoop rolling over my back. If I had missed, it would have rolled a half football field away down the hill. I had to do so much thinking on the fly, it was a challenge, but also a lot of fun! Hooping while walking is exhausting in itself, (hence the constant turning in a circle…makes it a little easier to maintain the hoop) never mind in the summer heat. I’m no spring chicken either. I was 46 years old when I did this parade.
I practiced in the costume to work out any bugs and try to prevent wardrobe malfunction!
I made the hoop to resemble gold rope. I make my own hoops out of irrigation tubing. Wrapped it in cloth gaffer tape in criss-crossing patterns and used gold metallic fabric paint , a hint of gold sparkle/glitter paint ,and a bit of spray paint to give it the golden lasso tone. The hooping wore off the metallic sheen on my red top…but I had another top ready to go for my run in October. :P
Great costume. Do you have instructions for the boot covers too? They are so cool!
thank you! Sorry I didn’t see this post/question sooner. I’ll start with the part that covers the shin. They are essentially greaves (shin armor) that lace up the back made out of red marine vinyl. Once I cut out the shape I needed to cover my shin, I doubled over the area where the eyelets would be (up the back of the calf.) I heated up the tip of an awl with a candle and poked holes down each side. (pre-measured the placement first.) Bought some red cord and laced up the back. ( I wore matching red knee highs to cover the gap in the back. I used glue to attach the white fabric stripes.) The shoe part: I found red lycra skate boot covers on amazon .com/ The stretchy lycra slips over my running shoes easily. A big elasticized hole existed on the bottom to accommodate a an ice skate blade. I sewed the hole partially closed with heavy duty thread. (Can’t really close up the entire opening…you’d have an uncomfortable lump under the center of your foot.) It just needs to keep the lycra in the right place. I took a little tuck where the arch of my foot is so I hugged the contours of my running shoe well. (Do all this while it is ON the shoe.) I traced the outline of the sole on cardboard, then used that as a template to make black heavy duty vinyl soles. Protect the sole of your shoe with the cardboard before gluing the black vinyl onto the bottom. Protect the top of your shoe by slipping cardboard in between the lycra and sneaker before adhering the white stripe.
Side note: after all that work, they were essentially wrecked after one three mile race. The back shifted a little bit under my heel and a hole formed in the lycra. An extra large pair of socks put on over the sneaker would perform the same function, and possibly hold up longer..it just won’t be all shiny and pretty. :)