Materials used for this Homemade Wind-Up Toy Nutckracker Soldier Costume:
Hot glue gun, needle+thread, duct tape, musical mechanism from my jewelry box, thinnest plywood available, wooden dowel, gold or silver spray paint, drill with tiny drill bit, heavy duty wood glue, approx 1 1/2 inch foam – can pull from a pillow, or find in crafts store, gold colored frilled edging (type you would find on bottom of higher end curtains), exaggerated GOLD buttons, wide white ribbon, stapler ,posterboard, fake
mustache.
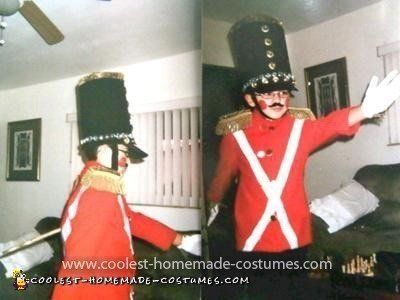
1)I purchased all clothing needed from “Thrift Stores.” Red “dressy” jacket, black “dressy” pants, black boots, white gloves. Also found glittery shirt (cut and used material for shoulder pads) and black sequined vest (cut and used material to cover front of boots), black fleece top (cut and used material to cover posterboard which is the TOP portion of hat )and black baseball cap. Total:$19!
2)HAT: I used a black baseball cap (flatten the visor), for the “height”, measure posterboard and cut to desired height, wrap around baseball cap so visor is the front of your hat, staple poster board so it doesn’t open, hot glue to baseball cap. Hole on top of hat can be covered tightly with fleece material, hot glue it so it doesn’t sag! Measure/cut black fleece and hot glue fleece to cover posterboard. Decorate (sew) with Gold Buttons,and suitable accessories. Chin Strap: I used a wide black elasti(same as what is inside of some pants/shorts),hot glue one end to inside of hat and cut button hole at other end (sew button inside hat) or use hot glue instead of button.
3)JACKET: Somewhat “fitted” RED jacket, be sure there is extra room for pulling material across front, you will be removing buttons and adding DOUBLE row of GOLD buttons, make extra button holes, if needed..jacket must close and some extra room will be needed when you add music box to your back. Measure and hot glue white ribbon in an “X” shape on front and back of jacket.
4)SHOULDER PADS: I found foam from crafts store very easy to work with, trace out shape of pad on foam for both shoulders, cut out and cover with gold colored material sew gold frilled edging around pads,then sew onto shoulders of jacket.
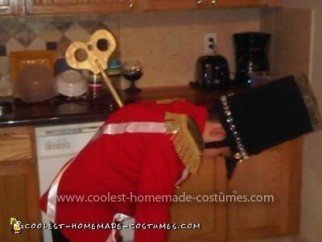
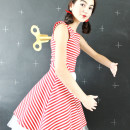
5)WIND UP KEY: This really is not that difficult! Went to Home Depot, got a wooden dowel..they are usually all the same length, you will cut to size. IMPORTANT** Get one that is not too thick or heavy..but one that will make a statement when added to the “key” handle. Piece of thinnest plywood (wall panel type.)
1st: Trace Key Handle with holes onto paper(you can go online and Google a pic of one,enlarge and print out. Trace cutout of Key onto edge of “panel wood”, holes too. Hopefully you are handy or know someone who is and can cut this out for you..use sandpaper to smooth out edges. Cut dowel down to size, make one small cut or vertical notch on both sides of end of dowel, and one on the base(at same end of dowel.) This will allow bottom of key to “fit” into place…with strong wood glue, attach both pieces and let stand to dry. When dry you will now be working on the end that will attach to the music box. Again, if you are not handy get help from someone with a drill and tiny drill bit..drill hole in end of dowel,you want it to be able to fit tightly onto the metal device of the music box, so when you turn the LARGE WOODEN key..it grasps it and turns it. Spray paint with Gold or Silver color..GOLD looks more realistic!! You will need to remove the small original “key” from the music box by turning it counter clockwise.
6)ATTACHING MUSIC BOX TO YOU: Using glue, such as epoxy, or any strong glue that will adhere metal(most music boxes are of metal) to wood. Cut a piece from the “panel” wood large enough to be placed in the middle of you back, somewhere between your waist and shoulder blades. Glue the flat side of the music box to this. Using duct tape, firmly tape the wood onto a t-shirt, around the waist and over the shoulders. Cover the music box carefully, with a small cardboard box..be certain that none of the moving parts are touching the sides of box. Cut a hole in box so metal “turning device” is visible with plenty of space. Put t-shirt on, then jacket..measure and cut opening in back of jacket to attatch wooden key. One slight push, and key should catch onto device. Turn key clockwise to start music box!
7)DON’T FORGET THE RED CHEEKS!! MUSTACHE TOO! HAVE FUN!


Of course it is the coolest costume ever. You have an amazingly brilliant boy paired with his super talented mother. What else would you expect? Do you do wedding dresses?
Nice , good job :)
Love it Love it Love it
Good job FAM
Just wanted to say, that my son had so much fun marching, and showing off a little, in this costume. It’s so nice to know that he really appreciates all the work I put into his costumes.