It’s embarrassing to admit, but I didn’t really know who David Bowie was when I started to research ideas for a Bowie-inspired costume. For years I have wanted to make costumes, and never had the time or opportunity. When folks were writing their New Year’s resolutions, I decided 2016 would be the “Year of FUN!!!” (three exclamation points, and all caps!). The last few years have been tough, and my spirit needed a break. I have been working hard and seriously my whole life, and came to the realization this year that giving myself permission to make having fun a priority was loooonnnggg overdue. Early in the year, an event popped up that encouraged superhero costumes. I threw together a costume overnight and went as Prock from The Awesomes. It won an award, which was very inspiring. I couldn’t wait for the next opportunity to make another costume.
The next opportunity was a tribute event for David Bowie. David Bowie? That’s some famous singer guy, right? I don’t remember exactly what I knew about him before all of this except that it wasn’t much. However, as soon as I started researching costume ideas, I was completely drawn in. His outfits were spectacular. I loosely follow fashion and trends, but I had never seen anything like them. His music was equally original. It was immediately evident that he was an extraordinarily talented performer. He also clearly had impeccable taste, a unique creative vision, and the courage to fully embody and express who he was.
In short, David Bowie was legendary. I quickly became excited and grateful to have an opportunity to create something original inspired by his body of work as a way to honor and remember him. I enjoy the challenge of trying to recreate a look as closely as possible, so I knew I wanted to pick one of his epic looks and attempt to recreate it. But which one to pick?
Like any artist that transcends time, Bowie reinvented himself. In his later years, he seemed to have completely moved on from the Ziggy Stardust era of his youth. He seemed disinterested in playing any of the old music in favor of creating new. In fact, he released an album just before he passed away that sounded much different than his earlier work to me. Yet each of his Stardust outfits were extraordinary and mesmerizing works of art. As I scrolled through the archival images and footage on fashion websites and YouTube, it became clear that my favorite Bowie looks hailed from the 1970s during Bowie’s Ziggy alter-ego days. My favorite look was the black body suit by Kansai Yamamoto with thin white stripes that looked like it could have been inspired by a vinyl record. I envisioned elevating a commercial grade contractor’s garbage bag (the heavier weight ones) to fine art through laborious fittings and hand painting white lines on the black plastic to replicate the original look.
I also considered learning how to knit in order to replicate the exact colors and pattern of one of his one-arm-one-leg body suits. And I was inspired by the choreography of his on-stage, mid-concert wardrobe changes where stagehands ripped one layer of expertly crafted garment away to instantly reveal an equally stunning new creation.
I did not have time for any of that. The event was less than a month away, which was hardly enough time to put together anything that would do Bowie justice. The detail and craftsmanship in each of his costumes was a sight to behold. Every single thing he wore in the Stardust era was one-of-a-kind, custom, made specifically for him. Everything spoke to his specific style, of a specific era. One would not find those things in any mall store today. It was clear that any Bowie costume would require a serious commitment to DIYing everything.
I didn’t initially want to make the flame outfit he wore in a 1973 performance of “Time” in London because others had already done it (search online for photos). But I could see that what would be required to make that outfit was something I would likely be able to finish within the available time with the skillset, budget, and materials I had access to. I knew people would like the flames, and I liked that the outfit had one arm and one leg exposed. This was a look I have only seen Bowie attempt. Iconically Bowie, any diehard fan of his (or someone exceptionally well-versed in fashion, perhaps) would surely recognize the silhouette and associate it with him. I don’t look at all like Bowie, so picking an iconically Bowie look could only help the costume.
My budget was tiny, and it was a lot of work, but seeing how much people loved it made it worth it. The best part of making costumes is definitely seeing people smile in delight in reaction to it. I didn’t really know who Bowie was when I started making this costume, but as I pieced it together I became a HUGE fan.
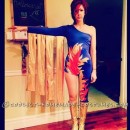
The costume won the costume contest at the event. Here’s how I made it:
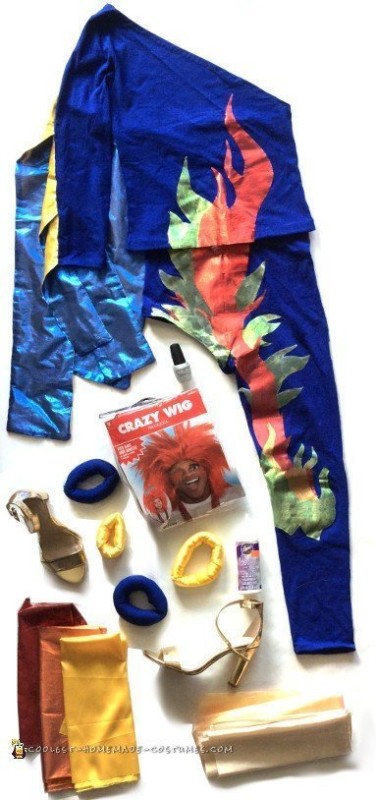
Final costume, accessories, and some materials
Base outfit
For the base outfit, I bought a knit top and leggings in the same color from Forever 21. I would recommend visiting stores in person to get the right color and fit. These were a good option for me because my budget was negative fifty.
I got home and promptly removed the right leg of the leggings and left arm portion of the v-neck top. I would have preferred to begin with a crew neck top, since I had to make it asymmetrical, but the v-neck top was all Forever 21 had that matched the leggings. The top ended up having a wider neck opening than I would have preferred, and I had to use garment tape to ensure everything stayed in place. Since my sewing machine is in storage, I roughly hand sewed the hems to finish the raw edges. It’s not pretty, but it worked.
I would recommend gradually removing fabric for this part because you don’t want to remove too much! I tried on the pieces several times between cuts to make sure the result would be decent. I would also recommend using wooly nylon for sewing spandex or knits that you want to retain the stretch in. I didn’t have this, and so was just careful to leave extra thread as I wanted to make sure there was some give. This is really not ideal, though, especially if the fabric needs to stretch a lot.
Flames
I then hit up a local fabric store to find flame like textiles in fabrics with stage presence. I picked a shiny metallic fabric (not sure what it’s called), and bought it in blue, red, yellow, orange, and light orange (like an oily orange sherbet). I did not use the orange or light orange because I didn’t think it would add anything, and thought it might actually detract.
I cut out the flames, trying to get them to look similar to how they look on Bowie’s original outfit. I used a “Permanent Fabric Glue” by Aleene’s to glue the flames down to the fabric. I just placed the cut out flames where I wanted them, and slathered glue all over it. The flame fabric was somewhat porous, and the blue knit fabric was thick enough for the glue not to bleed through. This technique worked really well for me, but always test with small fabric scraps first.
The glue label says the glue dries clear and flexible. I liked that the glue would have some flexibility since I was gluing to a knit that needed to stretch. I liked that it would dry clear, since I didn’t want to see it. Note that this glue does not dry clear on all fabrics. You need to test the glue out on the fabric you are using to see what happens. The glue did NOT dry clear on the blue knit fabric. I took extra care to keep it off the blue areas that were not going to be covered with flames.
For the flame design and layout, I knew I wanted the flames to appear continuous from top to bottom, despite the outfit consisting of two separate pieces. I also wanted to have the red streak down the leg, as in the original outfit. And I wanted to make sure part of the flame wrapped around the leg. I think when you’re designing something that is three dimensional, it is important to utilize all three dimensions.
Since the glue takes a day or two to cure fully, I worked in sections and skipped around. To line up the flames on the top and bottom, I lined up the garments, and cut the top flames to match the bottom. I had to hem both the top and bottoms to get the right fit. When I hemmed the top, I made sure it was long enough to slightly overlap the waistband of the leggings to make it look more seamless. This also gives more room for error to ensure you don’t end up inadvertently with a trendy but inappropriate crop top.
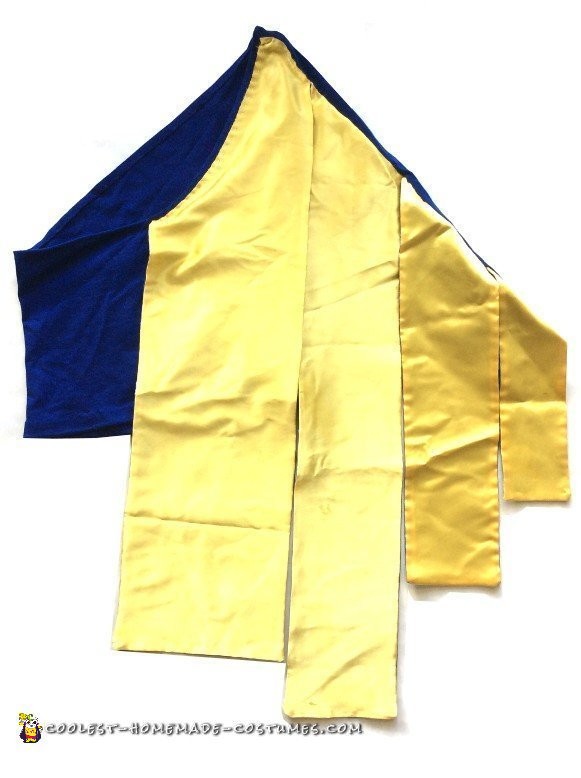
Back of top
Arm “ribbons” and leg “donuts”
For the “arm ribbons”, I bought a satin-y yellow fabric and paired it with the blue metallic fabric. Bowie’s original outfit had flames on the blue side of the ribbons. I opted not to do this because I was lazy, and because I think the flames there – while super cool from a technical and craftsmanship perspective – look a little busy.
Bowie’s original outfit has five arm ribbons, I believe, but I had to reduce the number to four because my arms are short. For the placement and scale of the ribbons, I made sure the top ribbon started around my back like Bowie’s, which I thought was a great design choice (as opposed to starting the ribbon at the shoulder). The resulting effect is that the widest ribbon wraps around from back to arm, and I think this lends more movement.
I also made sure to stagger the lengths of the ribbons. The second ribbon down the arm is the longest, the first (the wrap around one) is slightly shorter, and the ribbon length gets shorter towards the sleeve cuff. I made the back most ribbon long enough to cover my butt, which was also how the original look was designed, and went from there. The width of each ribbon also gets narrower towards the arm cuff, as in the original outfit. The shorter ribbon length by the hand also makes the design more functional. Getting the ribbon dimensions right and to scale while minimizing sewing (hand sewing, remember) and with minimal fabric (budget, remember) was probably the biggest challenge, but I like how they came out.
I made the arm and leg “donuts” out of scrap fabric and polyester batting (the kind you stuff pillows with). These required a couple of alterations to get the width and circumference just right.
Choosing and styling a wig
For hair, I bought the “Crazy Wig” from a costume shop because it was the least expensive red haired wig that would work. If you put on this wig out of the bag, the hair sticks out in all directions. It looks really silly and not at all like it could work for a Bowie costume, but I used serious hairspray to style the wig into a slicked back mullet style that was a huge hit. I also sprayed dry shampoo into the wig to reduce the shiny cheapness and make it look more realistic. I removed the leg portion of a pair of nylon stockings and knotted this to make an inexpensive wig cap. Thank you YouTube for these tips!
Make-up and nails
For make-up, I am not great at make-up. I watched a ton of YouTube drag make-up videos and taught myself how to cover my eyebrows using the purple glue stick and powder method. You need to get the glue on REAL thick. If you can’t see the purple, you don’t have enough glue. If you don’t have blonde eyebrows, you will probably need to use an orange lipstick or something to counteract the dark blue hue of the glue covered brow hair. Set everything with powder between glue applications, and make sure you are very precise with applying everything so it blends in with your skin well and doesn’t turn into a huge mess. I opted to leave my face bare other than that – that was the look Bowie went with in the video. If I ever use this costume again, I’d like to try the gold sun on the forehead with the red tinted sides of the face look. I opted for no make-up because I didn’t want anything to compete with the outfit.
For nail polish, I really like the L.A. Colors Color Craze nail polish in color “Live”. It’s a sparkly silver that goes on opaque in one coat and takes almost no time to dry. It also was no more than $2 at the drugstore. I’ve since tried several other colors by L.A. Colors, to varying results. They do all seem to dry very quickly, but the other glitters I’ve tried require several coats.
Shoes and final thoughts
In the look below, the outfit is paired with nude flats, but the final look was paired with mirror metallic gold stilettos, which is so much better but not as comfortable.
The resulting flaming leg did not have a lot of stretch. The glue really inhibited a lot of the stretch. This is the one downside to having the flame wrap around your leg. If reduced stretch is a concern, you may want to minimize the lateral coverage of the flamed area. It would be such a bummer to finish the costume and then not be able to get into it!
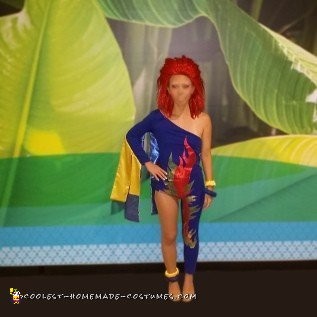
Final look
