WARNING: I want to be very honest from the start… this costume is very hard to make, expensive, time consuming, and not very comfortable to wear! This is only for people like me who are INSANE about Halloween and having unique, contest winning costumes every year.
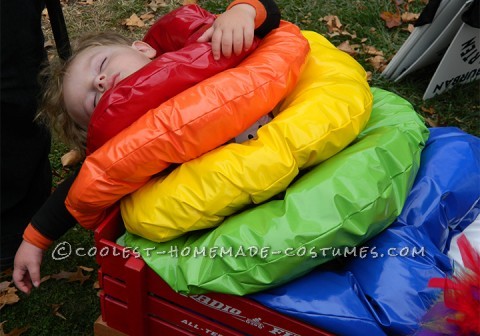
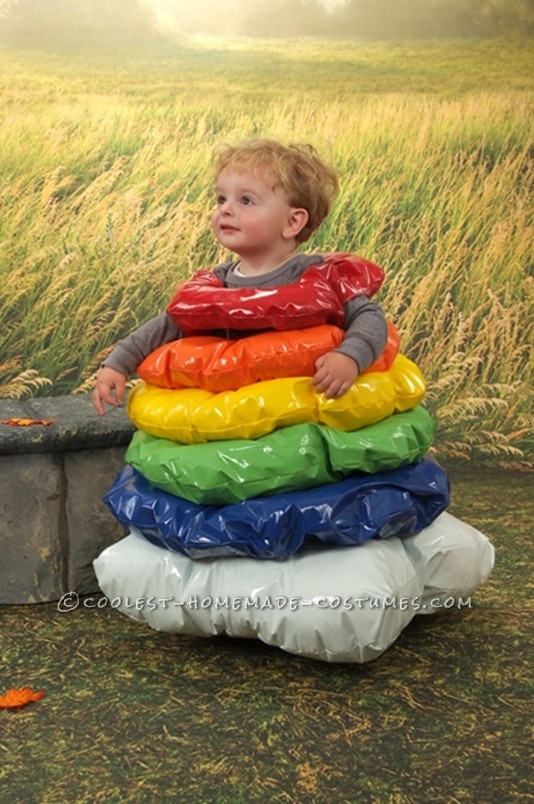
We usually try to do several events each year with the kids because we love Halloween so much! This year we took them to our town’s Halloween festival which features a costume parade and contest. The whole town walks up into the center of town in the parade and then they judge to costume contest. My son absolutely refused to walk in this costume, so we had to put him in the wagon and pull him up there. He hated wearing it so much he just passed out (see photos). Needless to say, we did not make him wear the costume trick or treating or to the other events we went to, but we did have professional pictures taken, since I put so much into the making of this costume.
I do have to say that almost every person we came into contact with made a comment about the costume and was amazed by it. Many people asked how I made it and when I went into the explanation did not follow, so I started saying simply… ” It was really hard and it involved using Pi to figure out the math”. That seemed to be good enough, LOL.
Preparation
There are many steps that need to be done to prepare for making this costume. The start to need to measure the person who will be wearing the costume because a tight fit is essential, and to make the scale of the costume true to the actual toy you need exact numbers. The circumference of the widest part of the person’s body, and the height from bottom to top of the torso are the important numbers.
You will need to buy:
Vinyl fabric in red, orange, yellow, green, blue, purple, and white (you may need to order certain colors online) The amount you need will depend on the size of the person wearing the costume, so do the math before you buy.
At least 3 yards of 1/4 inch elastic
Heavy duty clear thread
poly fill
You will need to fashion a compass out of two dow rods and a fabric marker, using duct tape to hold them together at the top. Make sure it is flexible at the top so you can adjust the width to make different circumference circles. You make this by holding the rods like chopsticks and taping one end of each dow rod to each other, making sure that one is up slightly higher than the other. Then tape a fabric marker to the shorter end, so that both ends are now approximately the same length. The end without the marker is the center rod, which will stay in place, and the other end with the marker will be pulled around to make a circle on the fabric.
Doing the Math (ugh…)
First, to determine the outside dimensions you need to use a 4 to 5.5 ratio, and apply it to the height of the person’s torso. That give you the overall scale. For example if the torso is 30 inches high, then we know the costume needs to be 20 inches top to bottom and 22 inches wide at the widest part (the bottom tier). Its best to round to whole inches for simplicity. This number is the diameter of the largest circle.
Second, use the circumference of the person’s torso to figure out how large the whole in the middle of each ring will need to be. We need to find out diameter so we can make a perfect circle that will fit around the torso, and we do this buy dividing the circumference measurement by 3.14 (Pi). For example if the circumference was 15 inches the diameter would be 4.8, but we would round that up to 5 inches. Next we divide that number by 2 so we know the radius, so for the example the number would be 2.5 inches. The radius is used with the compass to draw the circle for the center whole on each of the color rings.
Nest, we need to figure out large wide each of the color rings will be (outside dimension). The important thing to note is that each ring is an equal fixed amount smaller than the last. We start with the largest tier and subtract 1/15th of the circumference to determine the amount that will be the fixed difference between each layer. So for our example the base is 22 inches diameter, we divide 22 by 15 and get 1.5 (rounded). So we know that each layer is 1.5 inches smaller than the last.
So in the example we have 5 layers the first is 22 inches diameter, the 2nd is 20.5, the 3rd is 19, the 4th is 17.5, and the 5th is 16.
p.s. I am very sorry if my explanations are not clear enough. All of this math can be looked up online if clarification is needed.
Making the Base
The base of the toy is a white rocking ring, but you can make it a square bottom if you want to make it easier. Using the white vinyl you need to cut 4 strips 4 inches height and the same width as your largest ring’s diameter (see step 2 for math). Next, cut two perfect squares with the same width (as diameter of largest ring) to be the top and bottom of the base. Before you sew them all together you will need to but and finish the edges of two leg holes in the bottom square, and one round opening in the top square for the body to fit in. Then sew it together into a sort of flat cube and stuff it lightly with poly fill.
Then you need to sew the elastic into harness straps to hold the base up. This is not an exact thing. Start with two long loops to go over each shoulder attaching one end to the front of the hole cut into the top of the square and the other end to the back. You will then need to attach several straps connecting from one of the shoulder staps to the other to hold them securely in place. So one that will go across the chest and one across the stomach, then one across the upper back and one across the lower back.
This base holds the entire costume up, so make sure it is very secure. You can add additional straps if needed, and it does not have to look pretty because it will be hidden under the rings.
So now its time to make the rings!
Using the math you figured out in Step 2 you will be able to make the rings. If you have not yet constructed the make-shift compass please do that now.
Start by laying out the fabric vinyl side down and finding an approximate center point, mark it with a dot. you will place the center rod of the compass on that point and make the circle around it.
Please remember that you need to divide the diameter by 2 to get the radius, which is the distance that you will need to set between the rods at the bottom on the compass. Since this is not a real compass you just have to measure with a ruler, hold it it place and pull it around to make a circle. There is no way to lock it in place so you must keep you hand steady and make sure to measure it once the circle is complete to check for accuracy. It make take several tries until you get the hang of it.
Make sure you make 2 circles of each color in the sixes determined earlier in this process.
Place each of the same color rings facing vinyl sides together and sew the outside edges together the whole way around, except the top layer (red), in which you need to leave two small openings for the arm holes.
Then turn them right side out and sew the inside of each circle, leaving a hole large to put the stuffing in though. Except the smallest ring (red), which you should not sew shut, but should just turn the inside edges in and sew to finish.
Next stuff each layer lightly then stitch up the opening. Do not stuff tightly because the costume will be too heavy to wear. For the smallest layer you will need to make closed pouches of stuffing using old scrap fabric or pretty much anything you have around. This is neccessary becasue this layer will not be closed at all and you dont want stuffing to come out while the costume is being worn.
Putting the costume on…. Not as easy as it sounds!
Alright, after all that work it is finally time to put the costume on!
Make sure the person is wearing tight fitting, comfortable clothing. We had our son wear tight fitting pajamas.
Have them step into the base, putting each leg through one of the leg hole openings, and pull the elastic straps up over their shoulders. Make sure all the staps are snug, but not so tight that they hurt. Some adjustments made be needed her, so make sure you do a fitting a couple days before it will be worn out.
Then have the person lift up their arms and start stacking! It’s just like a huge version of the real toy. When you get to the last layer pull it over their head, then have them push their arms through the holes you left in the side seams.
You are finally done!
My 1 1/2 year old son liked the looks of this costume right up until we started stacking the rings on him. Then he started screaming! I had to take some of the stuffing out after the first fitting because it was simply too heavy for him. So be ready to make adjustments as needed, and my suggestion is not to make this for a toddler! LOL







Your comment has been sent successfully.