My boys are unique. They love animals. And while they like some things other boys like (Doesn’t every boy go through a “dinosaur” phase?) they also like to investigate obscure animals that most of us have never considered before. When other kids his age liked spiders and beetles, my son (at 3-years-old) decided that his favorite insect was the praying mantis, and that he wanted to be one for Halloween. Ugh. Seriously?! There are very few helpful ideas out there for praying mantis costumes. We got creative, though, and made it work.
The next year I was in “give-up” mode, (Yes, we’ve all been there!) and borrowed two costumes for my little guys. They went as a dinosaur and a shark (well, a reluctant shark – I think the costume lasted about half a block).
When my oldest was five he developed a fascination with ocean animals. His favorite was the colossal squid. “The what?” you might ask, and you wouldn’t be alone. Almost no one has ever seen a colossal squid alive, and because they live so deep in the ocean (the midnight zone, to be exact) they are difficult to study. We began a quest that ended with us checking out every book on mollusks in our city’s two-library system, including the ones far above his reading level at the time. My husband and I were tired of hearing about creatures like the chambered nautilus, the cuttlefish, and so many types of squid, but with the hopes of growing his intellectual curiosity, we pressed forward.
That fall my son proudly declared that he was going to be a squid for Halloween. Of course, he eventually decided that he was a giant squid, as a colossal squid was going to be too difficult to make (all those little spinning hooks on each arm would have taken hours to create and attach!). When I took to the internet for inspiration I found a few cute ideas, but had trouble finding something that looked like it would work for us. With the help of my assistant costume designer (he is quite the little artist!) and inspiration from many books and sketches, I decided to make a two part costume, with the head as a cone-shaped mantle, and then a dress-like tube of fabric with legs/arms attached to it. While I left out some details, the large eyes really brought the whole thing to life.
Once we left the realm of sea life behind us, my boys discovered the world of birds. “Great!” I thought. “We can see birds at our local parks, a local raptor rescue center, and at the zoo. Perfect! Finally they were interested in something familiar to our friends and family.” Well…not for long. While we learned about the ostrich and emu we must have inadvertently exposed the boys to one of our Zoobooks about endangered and extinct animals. One creature that caught his attention was the moa, an extinct bird from New Zealand, much like an ostrich. Once we started to look for birds like this one, we saw them everywhere: in history books and illustrated atlases, on a dinosaur puzzle we’d had for years, and in even in museums. Research on the moa led us to learn about the elephant bird, and eventually the prehistoric birds gastornis, diatryma, and the terror birds of South America.
Back in September my sweet boy declared that his costume this year would be a terror bird. I wasn’t sure if I was up to the challenge. After all, his little brother had decided that he wanted to be a wooly mammoth, and how could I possibly make BOTH costumes? My decision was made for me when I happened to find a darling triceratops costume in the right size for my second son to wear. I convinced him that he loved dinosaurs again (Hasn’t he seen every episode of Dinosaur Train, after all?), and that he could wear it this year, with only minor alterations.
Once I had agreed to create the new costume I didn’t have much time left. I took to Pinterest for some research, and put out a call for help to one of my most creative friends. She sent me the pattern for small birds that she had used to make décor for a friend’s nursery. The rest of our story is, as they say, history, as the result was the costume pictured below, which gained many admirers as my boys wandered through our neighborhood. Now my hope is that it will help others whose kids have similarly unique tastes in favorite animals and costumes!
My assistant designer (i.e. “opinionated child”) was quite clear that he was going to be a terror bird, and NOT any other type of prehistoric bird (moa, gastornis, or any type of pterosaur).
Make a mini. Then sketch to scale.
I used the following bird in a small fabric form to help me get an idea of what a bird costume would look like. This took less than an hour, and helped me get my mind around what needed to be done, since I don’t normally work without a pattern.
Based on my measurements of a small copy of the picture above (easy to carry around on my phone on Pinterest), and my son’s height (4 feet) I devised a scale of 1 cm=1 ft. The goal was to make a 4 foot version of a bird that was actually 10 feet tall. I also had to figure out where I could compromise. (i.e. The neck was not going to be thin, like the one in the picture, as my son’s head had to be in it.)
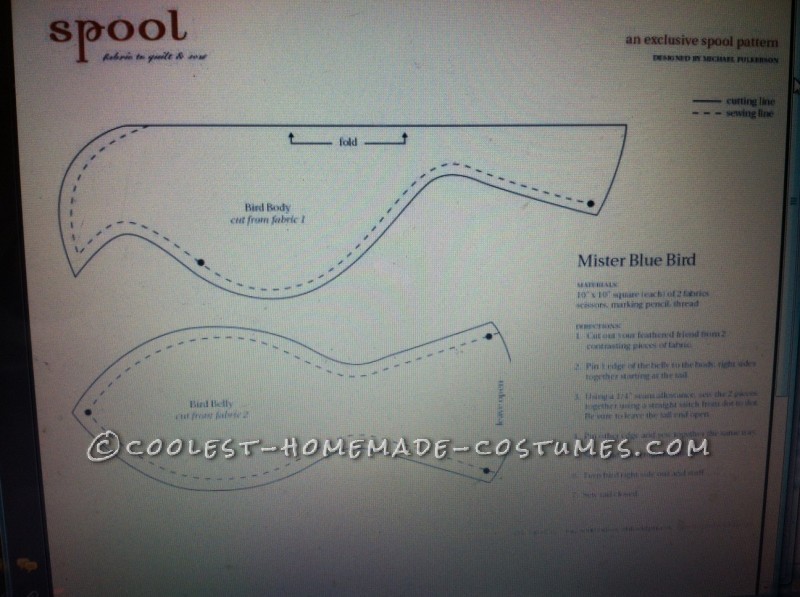
Small Bird Pattern
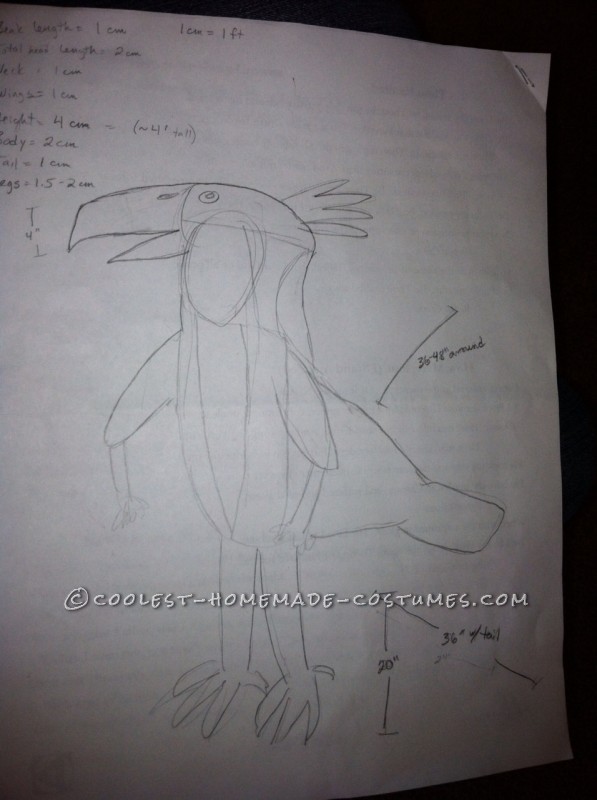
Terror Bird Planning Sketch
Choose materials. (Helpful Hints!)
To contain costs we decided to use fake fur, instead of feathers, for most of the costume. For the beak and feet we used cardboard-covered felt attached to my son’s bicycle helmet with packing tape. We did add a few feathers, and some sticky-backed foam for the talons.
To start with, if you don’t have a rotary cutter and cutting board, get one! Beg to borrow one from a friend – it will make your life easier. Since fake fur comes apart easily, it helps if you cut along the grain of the fabric, and then pull off any loose pieces before you start. If you use fur, be sure to check the direction of the fur when sewing panels together. Be sure to remember seam allowances when planning for the size of your pieces – I’d recommend about an inch, especially if you want to use wide pieces of Velcro somewhere in those seam allowances.
Begin with the beak.
I started with the beak and head, using cardboard (think of a FedEx envelope) which I shaped into a beak and then covered. Be sure to get a wide enough piece of felt so you can fold it around the beak completely. Also be sure that the fabric for the head covers the tape on the helmet. And use some dark fabric to cover the hat/helmet underneath if it’s a light color. (Am I the only one who remembers how the Muppets all have black felt inside their mouths?!)
Build the body. (Here’s where it gets tough!)
If I had had more time (and scrap fabric sitting around) I would have made the whole bird to scale so I could create an accurate pattern before working with the fake fur.
- Instead, I started with the concept of a vest. It was a good idea, but my mistake here was making the back end of the bird too long, and not leaving extra room to make the front (stomach/breast of the bird) look larger.
- While my son wanted a different color for the breast, it could just as easily have been made with a single piece of fabric. I then pinned the fabric together (while on my son) to get an idea of the size and shape of the back piece.
- Once I cut it, I sewed the tail (leaving open enough space for my son’s legs), and then stitched the shoulders together. (NOTE: I used Velcro to leave a larger neck opening, and to close it up a little more.)
- I filled the tail with large plastic packing materials (zipper bags filled with air would work here too) so the tail would stand up, and would still be lightweight.
- I sewed the front and back sides together – leaving room for the armholes. (This would be another good place to use Velcro to allow for more room when putting the costume on. Fake fur doesn’t stretch!)
- The wings and end of the tail were almost an afterthought to me (notice that neither takes up much room in the picture) so I made some ¾ length sleeve-wings that worked perfectly for us. The tail ended up being too long, on a body that was too long. Had my son been home from school to try it on while I was finishing it, we would have gotten the proportions adjusted more accurately.
- Afterwards I realized that sewing the tail together didn’t allow much room for coverage on the back lower part of the costume, so I added about a 4” strip of fabric around the back that then connected to the front.
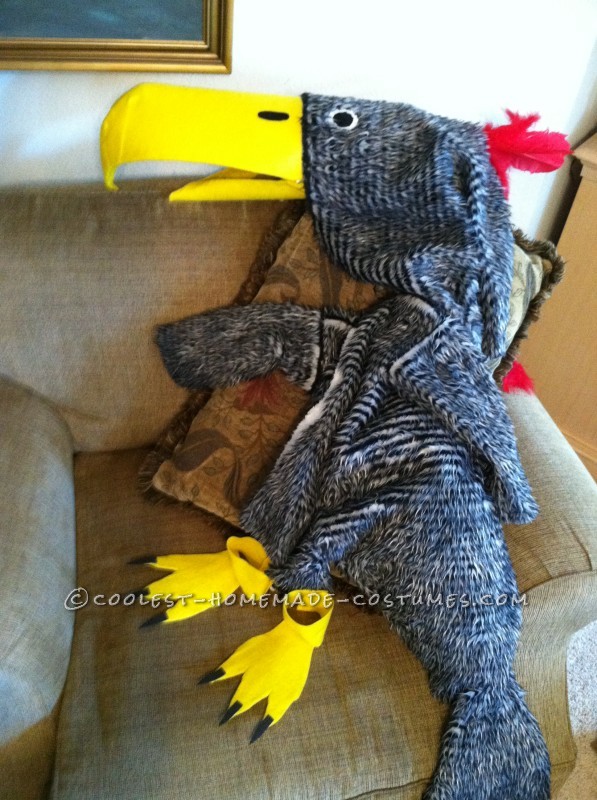
Terror Bird Costume Parts
Fabricate the feet and and watch out for talons!
I made simple feet out of cardboard, then covered them with yellow felt (added black talons cut from a sheet of sticky-backed foam) and stitched them to yellow ankle bands fastened with Velcro. (NOTE: I made the bands large enough to cover the bottom of the yellow pajama pants that were used for the costume, but failed to allow for a way to fasten the cardboard to or around my son’s shoes. At one point he had feet facing the wrong direction! I would suggest attaching some elastic bands to the back of the feet so they can wrap around the shoes.)
Love love love it, Bree! Amazing job!
Love love love it, Bree! Amazing job!
If we lived near each other, we could form a support group. Last year my boys wanted to be a parrot and a Smilodon. This year it’s a terror bird and megalania. Can’t wait to see what you come up with next.
If we lived near each other, we could form a support group. Last year my boys wanted to be a parrot and a Smilodon. This year it’s a terror bird and megalania. Can’t wait to see what you come up with next.